Hiring Concrete Equipment: A Homeowner’s Guide
Improving or maintaining a home often means dealing with concrete. Whether you’re giving your driveway a fresh look, building a new patio or resurfacing a garage floor, concrete projects demand the right tools. Many homeowners assume that only professionals can access specialised equipment, but rental companies now offer an impressive range of concrete equipment for hire. Renting allows you to tackle tough jobs without the cost and storage issues of owning rarely used machines. However, understanding what each machine does and how to choose the right one is essential for a safe and successful project.
This eBook is written for homeowners in Australia who are keen to take on concrete-related tasks themselves or supervise tradespeople more confidently. The information is presented in Australian English and tailored to our unique climate, building styles and hire market. Each chapter introduces a different type of equipment, explains how it works, outlines typical uses at home, describes what to consider when hiring, and includes tips for operation and safety. Examples and practical advice appear throughout to help you make informed decisions. At the end of the book you’ll find a list of references used to prepare this guide.
Why Hire Instead of Buy?
Before diving into specific machines, it’s worth considering why equipment hire makes sense. Cost savings are the most obvious benefit. Large machines such as concrete grinders or floor sweepers can cost thousands of dollars to purchase. If you only need them for a single project or a few days each year, hiring is far cheaper. You also avoid the ongoing costs of maintenance, storage and insurance.
Hiring gives access to professional-grade equipment that might otherwise be out of reach. Many rental firms stock the latest models, which perform better and offer features that improve efficiency and safety. For example, a modern scarifier has dust extraction ports to protect your lungs, while a high‑quality floor scrubber has vacuum recovery to leave surfaces dry and safe to walk on.
Another reason is technical support. Reputable hire businesses provide advice on selecting the right machine, using it safely and achieving a good finish. Some deliver equipment directly to your home and demonstrate operation. It’s like having an expert on call, which can make a big difference when you’re unfamiliar with a machine.
Finally, hiring allows flexibility. You can hire equipment for a day, weekend or longer, scheduling it to coincide with tradespeople or other parts of your renovation. If your project changes, you can return the machine and swap it for something more suitable. Owning equipment locks you into a single tool that may not be ideal for future jobs.
With these benefits in mind, let’s explore the common types of concrete equipment that homeowners might hire for residential projects.
Glossary of Terms
Over the course of this eBook, you may have encountered technical terms specific to concrete work and equipment. This glossary provides definitions and context to help you understand the jargon and communicate effectively with hire staff or contractors.
Abrasive Segments: Metal or resin‑bonded components containing diamond grit, attached to grinding machines. As they rotate, the diamonds abrade the concrete surface. Coarse segments remove material quickly; fine segments polish surfaces.
Aggregate: The sand, gravel or crushed stone in concrete. Exposing aggregate through grinding or polishing creates decorative effects. The size and type of aggregate influence the appearance and strength of concrete.
Concrete Densifier: A liquid chemical (often lithium or sodium silicate) applied to concrete. It reacts with free lime in the concrete to form calcium silicate hydrate, which hardens and densifies the surface, improving abrasion resistance and reducing dusting. Densifiers are commonly used during polished concrete processes.
Cutting Depth: The maximum thickness of material that a saw blade can cut in a single pass. It is determined by blade diameter and the position of the arbor relative to the surface. Knowing the required cutting depth ensures you select the right saw.
Diamond Segments/Pads: Embedded diamond particles on metal segments or resin pads used in grinders and polishers. Diamonds are one of the hardest materials and cut or polish concrete efficiently. Different grades and bond materials suit different stages of grinding or polishing.
Dust Shroud: A protective cover attached to grinding, sanding or cutting equipment that encloses the working area and connects to a vacuum hose. It captures dust before it becomes airborne, protecting the operator from inhaling silica.
Floor Burnisher: Another term for a floor polisher. It describes a high‑speed machine used to buff or burnish floors to a glossy finish. Burnishers often spin at speeds over 1,500 RPM.
Hammer Drill: A power drill that combines rotary motion with a percussion (hammer) action. Suitable for drilling small holes in masonry and concrete. The hammer mechanism is usually less powerful than that of a rotary hammer.
Laitance: A weak, dusty layer of cement and fines on the surface of concrete created by excessive water or improper finishing. Laitance must be removed (often by grinding or sanding) before applying coatings or adhesives, as it prevents proper bonding.
Masonry Bit: A drill bit with a hardened tip (often tungsten carbide) designed to cut through masonry materials such as concrete, brick and stone. The tip withstands the abrasion and heat generated when drilling hard surfaces.
Overlay: A thin layer of polymer‑modified cementitious material applied over existing concrete to resurface it. Overlays can be decorative (e.g., stamped patterns) or functional (e.g., self‑levelling underlayment). Proper surface preparation with grinders or scarifiers is essential for adhesion.
Polished Concrete: A multi‑step process of grinding, honing and polishing a concrete surface with progressively finer diamond tools to achieve a smooth, glossy finish. It often involves applying a densifier and protective sealer to enhance durability and appearance.
PPE (Personal Protective Equipment): Safety gear worn to minimise exposure to hazards. For concrete work, PPE includes respirators or dust masks, safety glasses, hearing protection, gloves, steel‑capped boots and sometimes high‑visibility clothing or hard hats.
Rotary Hammer: A heavy‑duty drilling machine with a piston mechanism that delivers strong hammer blows while rotating the bit. Rotary hammers are more powerful than hammer drills and are used for larger diameter holes or chiselling.
SDS (Steck‑Dreh‑Sitz): A German acronym meaning “insert‑twist‑stay,” referring to a type of drill bit shank used in rotary hammers. SDS bits have slots that allow the bit to slide in the chuck while being firmly held, improving hammer efficiency and reducing bit slippage.
Slurry: A mixture of water and fine concrete particles produced during wet grinding or cutting. Slurry must be managed to prevent environmental contamination. It is typically collected with a wet vacuum and disposed of according to local regulations.
Surface Profile: The level of roughness of a prepared concrete surface. It affects adhesion of coatings, overlays and adhesives. Different profiles (measured as Concrete Surface Profile, CSP, from CSP1 to CSP9) are achieved through sanding, grinding, scarifying or shot blasting. Most residential coatings require CSP2–3.
TCT (Tungsten Carbide Tip): A type of cutter material used in scarifiers and drills. Tungsten carbide is extremely hard and resists wear, making it suitable for aggressive milling and drilling tasks.
Wear Charge: Some hire agreements include a fee based on the wear of consumables (e.g., diamond blades). Always ask how wear is measured and charged. Returning a blade with excessive wear may incur additional cost.
DIY or Hiring: Making the Choice
The decision to do it yourself (DIY) versus hiring a professional or equipment is influenced by your budget, time, skill level and the complexity of the task. Hiring concrete equipment empowers you to complete many tasks yourself, but there are circumstances where engaging a contractor might be wiser.
Advantages of DIY with Hired Equipment:
• Cost savings: Paying only for equipment hire can be much cheaper than labour costs for a contractor. You control the time you spend, and many small projects can be completed over a weekend.
• Learning new skills: Using hired equipment builds confidence and skill. You gain understanding of your home’s materials and may feel more comfortable tackling future projects.
• Scheduling flexibility: You’re not dependent on a contractor’s timetable. You can work when it suits you, whether that’s after work hours or over a long weekend. This reduces the risk of projects overrunning due to tradesperson availability.
• Sense of accomplishment: Completing a project yourself provides personal satisfaction and a tangible outcome you can take pride in.
Reasons to Hire a Contractor Instead:
• Complex or hazardous tasks: Cutting large openings in structural walls, extensive concrete removal, underpinning or large‑scale slab replacements should be handled by professionals. Mistakes can compromise structural integrity and safety. Contractors have the experience, licences and insurance to carry out these tasks.
• Time constraints: If you need a job finished quickly and lack the time, hiring a professional ensures the work is done efficiently without disrupting your schedule. This is especially true for tasks requiring specialised knowledge such as polishing large concrete floors to a high gloss.
• Permits and regulations: Some concrete jobs (e.g., altering structural elements or adding driveways) may require council permits or inspections. Professional contractors understand local regulations and can handle paperwork and compliance.
• Cost of mistakes: Errors in concrete work can be expensive to fix. Hiring a professional may cost more up front but could save money in the long run if you avoid costly mistakes or rework.
If you decide to DIY, consider attending workshops or watching instructional videos. Many hire companies offer short training courses on operating specific machines. Starting with small projects helps you gain confidence before tackling bigger tasks. Ultimately, the choice depends on your comfort level, the nature of the job and the value you place on professional results versus personal satisfaction.
Concrete Grinders
What Is a Concrete Grinder?
A concrete grinder is a floor preparation machine with one or more rotating discs fitted with abrasive segments. These discs wear down the top layer of concrete to remove coatings, smooth rough patches or polish surfaces to a high sheen. Grinders vary in size from handheld units suitable for edging to large walk‑behind machines used to prepare slabs in factories or warehouses. Some feature planetary gear systems, where multiple smaller heads rotate around a larger disc, giving an even finish over a wide area. Others are single‑head units that are more compact and easier to manoeuvre.
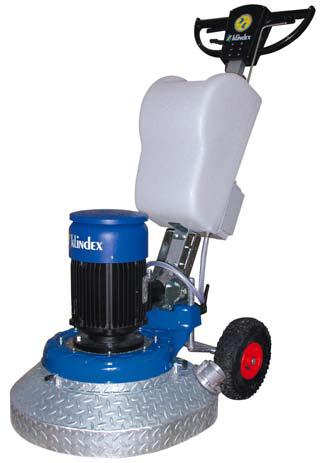
“Levetec Grinder” by Wayne Wheller. Source: Wikimedia Commons. The creator has released this image into the public domain
Uses and Applications
For homeowners, concrete grinders are invaluable for several tasks:
- Surface preparation for coatings: If you plan to apply epoxy paint, sealers or overlays to a garage or patio, the existing surface must be clean and slightly rough to help the new material bond. A grinder removes old paint, adhesives or sealers and creates a textured profile that improves adhesion.
- Levelling uneven slabs: Outdoor areas, driveways and interior concrete floors sometimes have high spots caused by poor pouring or settlement. A grinder can shave down these high spots to create a level surface, preventing trip hazards and allowing for better fitting of tiles or flooring.
- Polishing concrete: Polished concrete floors are popular for their modern look and low maintenance. A planetary grinder equipped with progressively finer diamond polishing pads can transform a dull slab into a glossy finish. The process typically starts with coarse grit (around 30 or 50) to remove imperfections and gradually moves through medium and fine grits (100, 200, 400 and 800 or higher) for a mirror‑like shine.
- Removing trip hazards: Garden paths or small slabs that have become misaligned can be ground down to remove trip edges. This is particularly helpful if you have tree roots pushing up pavers or slabs.
- Creating decorative finishes: Homeowners experimenting with concrete countertops or custom benches can use small grinders to hone edges or expose aggregate for a decorative effect.
What to Look for When Hiring
To choose the right concrete grinder for your project, consider the following factors:
- Type of surface and area size: Large walk‑behind grinders are efficient on big, open areas such as garage floors or driveways. For tight spaces, edges or vertical surfaces, a handheld grinder or smaller single‑head machine is more appropriate.
- Power source: Grinders can be electric, petrol or battery powered. Electric models are common for indoor use because they produce no fumes. Ensure that you have access to the correct voltage and that your power supply can handle the machine’s demand. Petrol units are powerful but should be used outdoors because of exhaust gases.
- Dust extraction: Grinding concrete produces fine silica dust, which is hazardous when inhaled. Hiring a grinder with an integrated dust shroud and connecting it to a vacuum or dust extractor significantly reduces airborne particles. Some companies include vacuum systems in the hire package.
- Disc size and speed: Disc diameter affects productivity; larger discs remove material faster but may be harder to control. Variable speed controls are useful because they let you adjust the rate to suit the task—slower for fine finishing and faster for material removal.
- Attachments: Make sure the hire company supplies the correct diamond segments or polishing pads. Coarse grits are needed for removing coatings or heavy grinding, while fine grits are used for polishing. Ask for advice on which segments to hire and whether you’ll need a set of progressively finer pads if polishing.
- Weight and ergonomics: Heavier machines often cut more aggressively but may be difficult to move, especially if your workspace involves steps or slopes. Some grinders have adjustable handles or counterweights to reduce operator fatigue. Check if the hire company offers training on proper handling.
Tips for Using a Grinder
• Prepare the area: Remove furniture, sweep away debris and check for embedded objects (e.g., nails or screws) that could damage the grinder. Cover nearby items and openings to prevent dust migration.
• Use personal protective equipment (PPE): Wear a dust mask or respirator rated for silica, safety glasses, ear protection and sturdy boots. Gloves help with vibration and protect your hands from diamond segments.
• Start with a coarse grit: If removing coatings or levelling, begin with a 30‑ or 50‑grit segment. Move the machine slowly and evenly, overlapping passes to avoid creating ridges.
• Switch to finer grits gradually: If polishing, progressively switch to finer grits (e.g., 100, 200, 400) after each pass. Clean the surface between grit changes to prevent scratches from leftover particles.
• Control dust: Keep the vacuum running and periodically check that the dust shroud is sealed against the surface. If using water for polishing (wet grinding), control slurry run‑off and clean up immediately.
• Take breaks: Grinding can be physically demanding and noisy. Take short breaks to inspect your progress and adjust your technique.
• Clean the machine: At the end of the hire, clean the grinder and return it in good condition. This may avoid additional fees and ensures the machine remains in good working order.Example Scenario
Imagine you’re re‑doing your garage floor. The slab is stained and slightly uneven from years of use. You plan to apply a two‑part epoxy coating, but first you need a clean, level surface. Hiring a single‑head electric grinder with 250 mm discs is a good choice. The hire company supplies coarse diamond segments and a dust extractor. Over two days, you remove old paint, grind down high spots and vacuum dust. After cleaning the slab thoroughly, you follow up with a medium grit to refine the texture. With minimal disruption to neighbours (electric grinders are less noisy and produce no fumes), your floor is ready for the epoxy coating, and you avoid the expense of paying a contractor to do the prep work.
Concrete Sanders
What Is a Concrete Sander?
While the term “sander” often conjures images of woodworking, concrete surfaces can also be sanded to remove minor imperfections or smooth rough edges. A concrete sander is usually a small handheld grinder or orbital sander fitted with silicon carbide or diamond sanding discs. These discs abrade the surface in a less aggressive manner than a grinder, making them suitable for finishing work. Concrete sanders are ideal for smaller tasks such as smoothing patch repairs, chamfering edges or preparing walls for painting.
Concrete polishing machine J1” by Jamain is licensed under CC BY‑SA 3.0 and can be found at https://commons.wikimedia.org/wiki/File:Concrete_polishing_machine_J1.JPG
Uses and Applications
- Finishing patch repairs: After filling holes or cracks with repair mortar, the patched area might be slightly higher than the surrounding slab. A sander with medium‑grit paper can smooth the repair flush with the adjacent concrete.
- Chamfering edges: Sharp edges of steps or decorative concrete can be rounded or chamfered to prevent chipping and reduce injury risk. Sanding helps you achieve a neat, consistent profile.
- Preparing walls for painting: Older retaining walls or block fences sometimes have textured or uneven surfaces that need a light sand before painting. A smaller sander is easier to handle than a large grinder, especially on vertical surfaces.
- Removing minor stains: Light scuffs or stains on concrete countertops or polished floors may be removed with fine sanding discs followed by resealing.
What to Look for When Hiring
- Type of sander: Orbital sanders produce a fine finish and are less likely to gouge concrete. However, they are slower at removing material. For more aggressive removal, a handheld angle grinder fitted with a sanding disc or a specialised concrete sander is better.
- Disc compatibility: Ensure you get the correct discs (usually 125–150 mm in diameter) with the right abrasive grade. For smoothing, 80‑ to 120‑grit discs are typical. For finishing, 220‑ to 400‑grit discs may be used.
- Dust extraction: Concrete sanding creates fine dust similar to grinding. Choose a sander with a dust collection port and hire a compatible vacuum if available.
- Weight and ergonomics: You may be sanding overhead or on a vertical surface, so a lightweight tool with comfortable grips reduces fatigue.
- Power source: Electric sanders are standard. Check that your power supply suits the tool. Battery‑powered sanders offer more mobility but may have shorter runtimes.
Tips for Using a Sander
• Safety first: Wear eye protection, a dust mask or respirator, and hearing protection. Gloves improve grip and reduce vibration.
• Secure the surface: If you’re sanding a small object such as a concrete paver or countertop, clamp it securely to prevent movement.
• Start with a test area: Begin in an inconspicuous corner to gauge the aggressiveness of your sanding disc. Adjust your pressure and technique accordingly.
• Keep the tool moving: Like sanding wood, you should maintain even motion to avoid creating dips or swirl marks. Do not press too hard; let the abrasive do the work.
• Clean as you go: Frequently wipe or vacuum the area to remove dust and inspect your progress. Accumulated dust can clog discs and reduce effectiveness.
Example Scenario
You’ve repaired a cracked step at your back door using a fast‑setting repair compound. Once cured, the patch protrudes slightly above the original concrete. Instead of chipping away at the hard material, you hire a handheld concrete sander for half a day. With 100‑grit discs, you carefully smooth the patch flush with the surrounding surface. After sanding, you wipe away dust, apply a sealer and the repair blends seamlessly with the rest of the step.
Pressure Washers
What Is a Pressure Washer?
A pressure washer (also called a high‑pressure cleaner) uses a pump to increase water pressure and eject it through a nozzle. The intense stream loosens dirt, mould and stains from surfaces like driveways, patios and paths. Some washers have adjustable pressure settings and interchangeable nozzles to change spray patterns. Models range from small electric units producing around 1,500–2,000 pounds per square inch (PSI) to powerful petrol units exceeding 3,000 PSI.
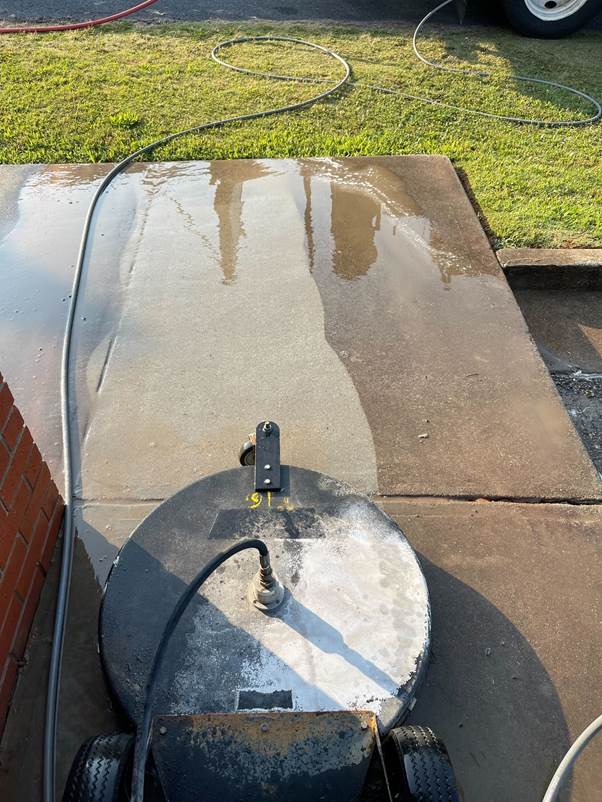
Concrete Cleaning with a Surface Cleaner” by Sherapower99 is licensed under CC BY‑SA 4.0 and can be found at https://commons.wikimedia.org/wiki/File:Concrete_Cleaning_with_a_Surface_Cleaner.jpg
Uses and Applications
Homeowners find pressure washers handy for many tasks:
- Cleaning concrete driveways and paths: Over time, concrete accumulates grime, tyre marks, algae and moss. A pressure washer quickly removes these contaminants, restoring a bright surface without harsh chemicals.
- Preparing surfaces for sealing or painting: If you plan to seal your driveway or paint an exterior wall, washing first removes dirt and chalky residue so coatings can adhere properly.
- Removing stains: Oil leaks from vehicles, tannin stains from leaves or bird droppings can be tackled with a pressure washer. A detergent designed for pressure washers may be added to the intake for better results on stubborn stains.
- Cleaning retaining walls and fences: Brick or block walls that have green growth or efflorescence benefit from a pressure wash.
- Washing outdoor furniture, BBQs and decking: With the right nozzle and lower pressure, you can wash timber decks or outdoor furniture without damage.
What to Look for When Hiring
- Pressure rating (PSI) and flow rate (litres per minute): Higher pressure removes tough stains faster but increases the risk of damage. For concrete surfaces, around 2,000–3,000 PSI is usually sufficient. A flow rate of around 7–10 litres per minute provides a good balance of cleaning power and water conservation.
- Power source: Electric pressure washers are quieter and lighter, ideal for smaller tasks with access to an outdoor power point. Petrol models offer higher pressure and mobility but require fuelling and produce exhaust.
- Adjustable nozzles and attachments: Different nozzles create various spray patterns. A 0° nozzle delivers a very narrow, powerful stream and can etch surfaces if misused; a 15° or 25° nozzle spreads the water for general cleaning; and a 40° nozzle is gentle for delicate surfaces. Some washers also come with surface cleaners—spinning discs that clean large flat areas more evenly.
- Hose length and reel: A longer hose means fewer moves and reduces the risk of pulling the machine accidentally. An integrated hose reel keeps things tidy and reduces kinking.
- Detergent injection: Some machines have a detergent tank or downstream injector to mix cleaning solutions into the water stream. Ensure any detergent you use is suitable for your washer and safe for concrete.
- Safety features: Look for units with thermal protection to prevent overheating, a trigger lock to avoid accidental spraying and ground‑fault interrupters (RCDs) on electric models.
Tips for Using a Pressure Washer
• Avoid damaging surfaces: Start with a wide‑angle nozzle and stand at least 3–4 feet (about a metre) from the surface. Test the pressure in an inconspicuous area. You can move closer or switch to a narrower nozzle if needed. High pressure can chip concrete or erode mortar joints.
• Use appropriate detergent: Some stains (oil, rust) require a cleaner formulated for concrete. Apply the detergent, allow it to dwell for several minutes, then rinse with high pressure.
• Move methodically: Clean in overlapping strokes, similar to mowing a lawn. Work from the high end of a slope to avoid streaks and puddles.
• Be mindful of water run‑off: In many Australian jurisdictions, directing water (especially with detergent) into stormwater drains is prohibited. Collect or redirect dirty water onto your own property.
• Safety gear: Wear protective footwear, long pants and eye protection. Never aim the spray at people, pets or electrical components. Petrol models should only be used outdoors.
Example Scenario
Your driveway has become dark and slippery due to mould and moss, particularly after a wet Queensland winter. You decide to hire an electric pressure washer rated at 2,500 PSI with a 25° nozzle. After sweeping loose debris and applying an environmentally friendly driveway cleaner, you work your way from the top of the slope to the street, overlapping each pass. Within two hours your driveway looks like new. You rinse off residual detergent and allow the surface to dry fully before applying a penetrating sealer to reduce future growth.
Concrete Saws
What Is a Concrete Saw?
Concrete saws—also known as cutoff saws, road saws or demolition saws—are power tools with diamond‑coated blades designed to cut through concrete, masonry, brick and asphalt. They come in various configurations to suit different tasks. The blade may be a circular disc, chain or ring, and may be mounted on a handheld body, push cart or track system. Cutting concrete produces significant dust and noise, so many saws incorporate water delivery systems or connect to vacuums to minimise hazards.
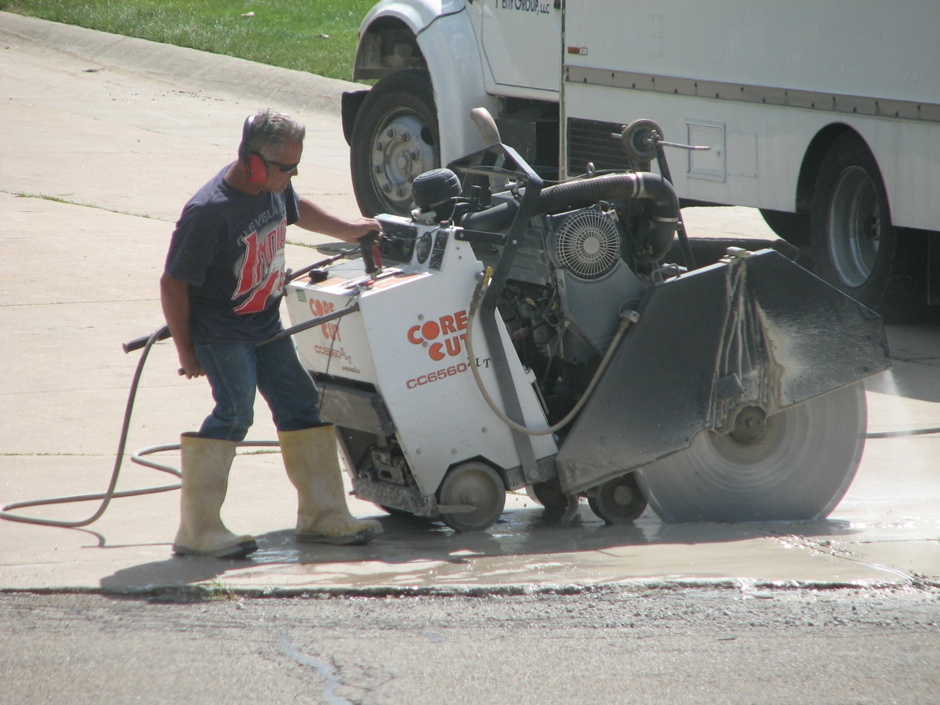
Concrete saw (operational)” by Kevin Payravi is licensed under CC BY‑SA 4.0 and can be found at https://commons.wikimedia.org/wiki/File:Concrete_saw_(operational).jpg
Types of Concrete Saws and Their Uses
- Concrete chain saws: These resemble woodworking chain saws but use specially designed diamond chains. They excel at cutting small openings, tight corners or irregular shapes. A chain saw can plunge cut through a wall or create controlled openings for windows, doorways or plumbing penetrations. Water supply is integral to keep the chain cool and reduce dust.
- Circular saws (handheld cutoff saws): These handheld units feature spinning blades (typically 300–400 mm diameter) and are versatile for general cutting. When fitted with diamond or abrasive blades, they cut through concrete blocks, pavers and small slabs. Adjustments to depth and angle allow for precise cuts. They are ideal for cutting pavers to fit around a garden bed or trimming off a misaligned slab edge.
- Walk‑behind saws: Also called push saws or floor saws, these larger units are mounted on carts with adjustable blades. They are used for cutting expansion joints, removing damaged sections of driveway, trenching for plumbing or electrical conduits and creating decorative grooves. The operator walks behind the saw, guiding it along a marked line. Self‑propelled versions reduce operator fatigue.
- Wall saws: These specialist saws have a track‑mounted blade that travels along a wall or vertical surface. They are used for precise cuts in vertical concrete such as cutting openings for doors, windows or air‑conditioning units. They usually require professional installation and are less common for DIY projects but may be hired with an operator.
- Ring saws: Featuring a blade that runs around a ring rather than through a centre arbor, ring saws can cut deeper than circular saws of the same diameter. They are good for cutting deep openings in walls or slabs without over‑cutting the corners.
- Road saws: Larger petrol or diesel‑powered units used for cutting asphalt and concrete on roads, driveways or large slabs. Unless you are replacing a section of driveway, these are more equipment than most homeowners need.
What to Look for When Hiring
- Cutting depth required: Determine the thickness of the slab or wall. For a driveway slab typically 100 mm thick, a handheld circular saw with a 300–350 mm blade may suffice. For deeper cuts (e.g., 150 mm plus), a ring saw or walk‑behind saw might be necessary.
- Power source: Electric saws are quieter and produce no fumes, but petrol saws are more powerful and portable. Ensure there is adequate ventilation if using petrol saws in garages. Battery‑powered saws exist but usually have limited run time for heavy cutting.
- Wet versus dry cutting: Wet cutting supplies water to the blade to reduce dust and cool the blade. Choose a saw with a water feed if possible. Dry cutting must be done with a dust extraction system and is best avoided for DIY jobs.
- Blade type: Diamond blades come in various formulations for cutting different materials. The hire company should supply the correct blade for concrete, asphalt or brick. You may need to pay for blade wear, so ask about wear charges.
- Vibration and ergonomics: Cutting concrete can be physically demanding. Look for saws with anti‑vibration handles, good balance and adjustable depth levers. Self‑propelled models reduce the push effort.
- Safety features: Check for blade guards, water connection points and reliable shut‑off switches. Operators must wear full PPE including goggles, ear defenders, gloves, boots and respiratory protection.
Tips for Using a Concrete Saw
• Mark your cut clearly: Use chalk or a straight edge to mark the cut line. Double‑check measurements to avoid mistakes, as cutting errors are hard to fix.
• Set up the work area: Ensure there is adequate space to manoeuvre the saw and that the slab is free of obstacles. Remove hoses or cords from the cutting path.
• Prepare the saw: Install the correct blade, tighten it properly and check that the water supply (if wet cutting) is working. If using a walk‑behind saw, adjust the blade to the correct depth before starting.
• Use proper body positioning: Stand with a stable stance and maintain a firm grip. Let the saw’s weight and the blade do the cutting; do not force it. Maintain a steady feed rate to avoid overheating the blade or stalling the motor.
• Control dust and slurry: Water will create slurry, so have a wet vacuum or shovel and bucket ready to collect it. For dry cutting, attach a vacuum to capture dust. Avoid breathing dust from concrete cutting as it contains silica.
• Stop and inspect: Periodically stop to check the cut, ensure the blade is not overheating and adjust as necessary. Allow the blade to spin freely for a minute after cutting to help it cool.
• Turn off and secure: Once finished, turn off the saw, allow the blade to stop completely, disconnect power or fuel and set the saw down. Clean up slurry or dust, and store the saw safely until returned.
Example Scenario
You need to install a new drainage pipe across your driveway to prevent pooling of water during heavy rain. The driveway is 100 mm thick concrete. You hire a walk‑behind petrol saw with a 350 mm diamond blade and a water hose attachment. After marking the trench line, you set the blade depth to 50 mm and make a first pass. You then increase the depth to 100 mm and make a second pass to cut through the slab completely. By controlling the saw’s speed and using water for cooling, you achieve a straight, clean cut. Once the section is removed and the pipe laid, you pour a new concrete section to restore the driveway.
Concrete Drills
What Is a Concrete Drill?
Drilling into concrete requires more than a standard household drill. Hammer drills and rotary hammers (also known as SDS drills) are designed to create holes in masonry using a combination of rotational and percussive action. Hammer drills generate a fast, hammering motion by two ribbed clutch plates, while rotary hammers use a piston mechanism to deliver more powerful blows. Both accept masonry drill bits tipped with tungsten carbide or diamond.
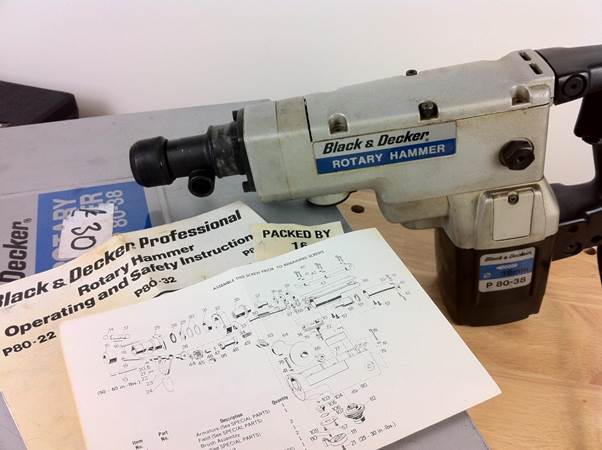
Black & Decker P80‑38 Rotary Hammer Drill – 2” by Mark Hunter is licensed under CC BY 2.0 and can be found at https://commons.wikimedia.org/wiki/File:Black_%26_Decker_P80-38_Rotary_Hammer_Drill_-_2.jpg
Uses and Applications
- Installing fixtures: Many home projects involve attaching items to concrete, such as hanging shelving in a garage, securing balustrades, mounting TVs on brick walls or fixing letterboxes. Drilling pilot holes for anchors or plugs is necessary before inserting screws or bolts.
- Drilling for rebar dowels: When extending a concrete slab or building a retaining wall, you may need to drill holes for steel dowels that tie new concrete to old concrete for structural integrity.
- Running conduit or pipes: Plumbing and electrical work sometimes requires holes through slab floors or walls for pipes and conduit. Drilling provides a neat opening for these services.
- Core drilling for larger openings: For bigger holes (e.g., for plumbing stacks or vent pipes), a core drill (rotary hammer with a core bit) cuts a cylindrical hole through concrete.
Hammer Drill vs Rotary Hammer
Deciding whether to hire a hammer drill or a rotary hammer depends on your task:
• Hammer drills resemble standard drills with a hammer function. They are suitable for lighter duty tasks and holes up to approximately 10 mm (3/8 inch) in diameter. They are adequate for anchoring brackets or fixing screws in brick or concrete blocks. Because they produce less impact energy, they are lighter and easier to control but may struggle with very hard concrete.
• Rotary hammers (SDS, SDS‑plus or SDS‑Max) use a piston mechanism to deliver more impact energy. They are recommended for drilling larger holes (10–50 mm or more) and for repetitive tasks. SDS bits have slots that lock into the chuck, allowing movement in and out while rotating, which reduces operator fatigue and prevents bit slippage. Rotary hammers can also be used in chisel‑only mode for light demolition, such as removing tiles or chipping away small sections of concrete.
What to Look for When Hiring
- Hole size and frequency: For occasional small holes, a hammer drill is sufficient. For larger holes or multiple holes, choose an SDS rotary hammer.
- Bit compatibility: Ensure the machine is supplied with bits suitable for your task. Masonry bits come in various lengths and diameters. For core drilling, hire a core bit (a hollow diamond‑tipped cylinder) that fits your drill.
- Power and speed settings: A drill with variable speed allows better control, especially when starting the hole. Rotary hammers often have modes: drill only, hammer drill and hammer only.
- Weight and ergonomics: Consider how long you will operate the drill and whether you need to work overhead or in tight spaces. Some SDS drills have side handles or vibration reduction features for comfort.
- Safety features: A clutch mechanism prevents injury if the bit binds. Ensure the power cord is long enough or use a heavy‑duty extension lead. For battery‑powered models, check the runtime and have spare batteries if needed.
Tips for Drilling into Concrete
• Mark the spot: Use masking tape to mark hole positions and prevent the bit from wandering. If you need multiple holes aligned, use a level or chalk line to ensure they are straight.
• Start slowly: Begin drilling at a low speed to create a small recess. After the bit establishes a track, you can increase speed. Maintain a perpendicular angle to the surface.
• Use steady pressure: Let the drill do the work. Pressing too hard can cause bits to overheat or break. Pull the bit out periodically to clear dust and cool the bit. A small handheld vacuum or blower helps remove debris from the hole.
• Clean the hole: Vacuum or blow out dust after drilling to ensure anchor adhesives or plugs bond properly. Dust left in the hole weakens hold strength.
• Wear PPE: Safety glasses, hearing protection and a dust mask are essential. If drilling overhead, wear a hat or shield to avoid falling dust. Gloves provide grip and protect your hands from vibration.
• Take breaks: Drilling can be physically demanding and generate vibration. Take breaks to avoid fatigue and allow the drill to cool.
Example Scenario
You plan to install a retractable clothesline on the wall of your brick garage. The manufacturer provides masonry anchors requiring 8 mm holes. You hire a hammer drill with a set of 6–10 mm bits. After marking the positions and drilling 50 mm deep holes at low speed, you clear the dust with a shop vacuum. You insert wall plugs and fix the clothesline bracket with screws. The job takes less than an hour and the clothesline is securely mounted.
Floor Polishers (Floor Buffers)
What Is a Floor Polisher?
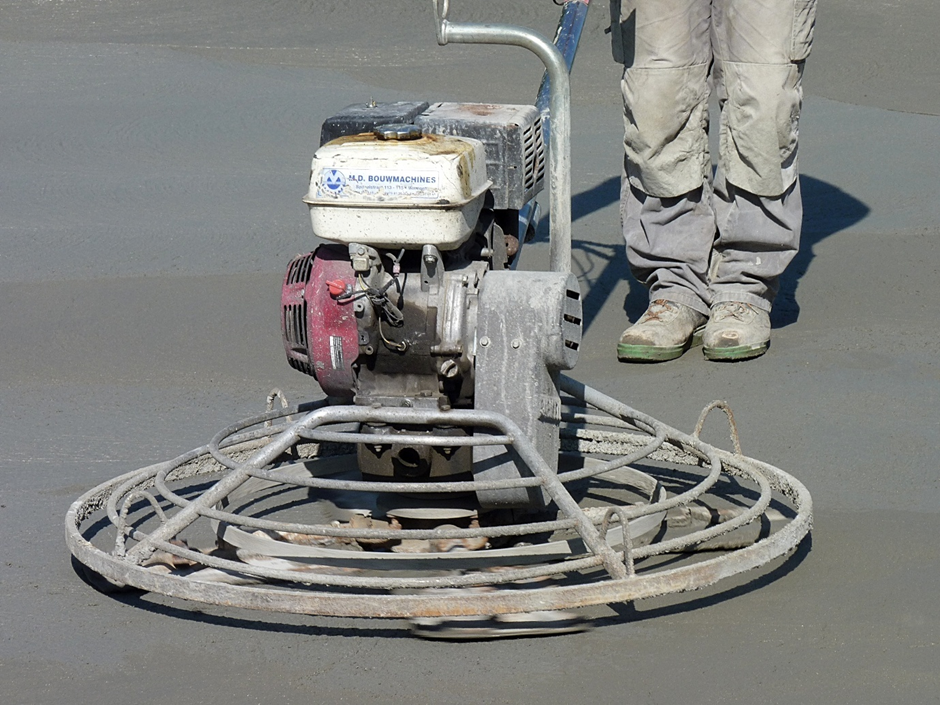
A floor polisher (also called a floor buffer or burnisher) is a machine with a rotating pad or brush used to clean, buff, or polish hard floor surfaces. For concrete, polishing improves appearance by bringing out shine and closes the pores of the concrete to reduce staining. While heavy planetary grinders also polish, a floor polisher is a lighter machine primarily for maintenance. It spins a pad at high speed (often 1,500–2,000 RPM) and may have a built‑in vacuum or a solution tank.
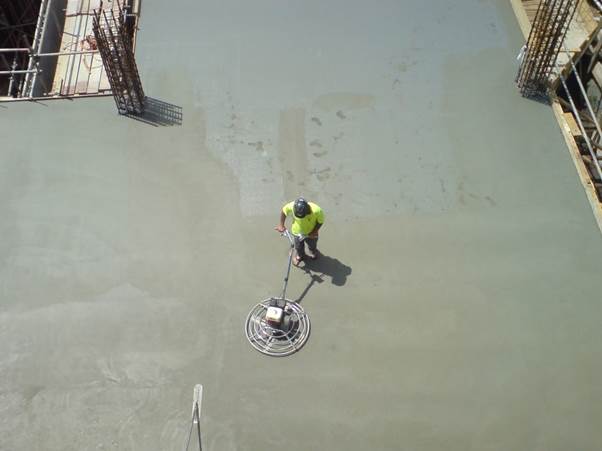
Rotary Polisher On Concrete” by Ingolfson has been released into the public domain and can be found at https://commons.wikimedia.org/wiki/File:Rotary_Polisher_On_Concrete.jpg
Uses and Applications
- Maintaining polished concrete floors: After initial grinding and polishing, regular buffing keeps the surface glossy and removes scuff marks. A burnisher used with a fine diamond pad or a polishing pad enhances shine.
- Cleaning and applying polish: For decorative concrete floors or sealed floors, a polisher can clean the surface and apply wax or polish. A soft pad distributes the product evenly without leaving streaks.
- Removing light scratches: While not as aggressive as grinders, polishers can remove superficial scratches or minor imperfections using appropriate pads.
- Buffing terrazzo, marble or vinyl: Many householders have mixed flooring materials. A polisher can buff various surfaces with the right pad, making it a versatile maintenance tool.
What to Look for When Hiring
- Pad diameter and speed: Common pad diameters range from 400–500 mm. Larger pads cover more ground but may be harder to manoeuvre. High‑speed polishers (1,500–2,000 RPM) are ideal for burnishing, while low‑speed machines (175–350 RPM) are suitable for cleaning or stripping. Some machines have dual speed settings.
- Solution tank: If you need to apply cleaning solutions or polish, a built‑in tank simplifies application. Otherwise, you may need to spray the product manually.
- Vacuum attachment: Some polishers have suction to collect dust generated during buffing or polishing. This is useful when maintaining concrete floors to reduce airborne particles.
- Weight and balance: Heavier machines exert more pressure, improving results on concrete. However, they require more effort to move. Look for adjustable handles and ergonomic grips.
- Pad types: The hire company should provide the right pads. For polishing, choose soft white or beige pads. For light scrubbing, choose red or blue pads. For stripping old finishes, use black pads. If you’re enhancing shine on polished concrete, diamond impregnated pads are best.
Tips for Using a Floor Polisher
• Choose the right pad: Using the wrong pad can scratch the surface or give poor results. Ask the hire provider for advice.
• Clean the floor first: Sweep and vacuum thoroughly. Remove dirt and grit that could scratch the surface.
• Operate with care: Hold the machine with both hands and keep the pad flat on the floor. If the handle is too high or too low, the machine can become difficult to control. Adjust it so that the handle is near hip level.
• Use overlapping passes: Similar to mowing, overlap each path slightly to ensure even coverage. Don’t linger in one spot, or you may create swirl marks or burn the surface.
• Work with appropriate solution: For polishing, the floor should be dry or only slightly damp with a specialised polish or densifier. For cleaning, use a pH-neutral cleaner diluted according to instructions.
• Clean pads regularly: Pads clog with dust and residue. Rinse or replace pads when they become dirty or worn.
• Practice on a small area: If you’re new to using a polisher, practice in an inconspicuous area to get used to the machine’s movement. Floor polishers often move side‑to‑side rather than forward and back; once you get the feel, controlling them becomes easier.
Example Scenario
Your living room has a polished concrete floor that has dulled after years of foot traffic and occasional spills. Instead of hiring a contractor, you rent a high‑speed floor burnisher and a set of diamond polishing pads. After thoroughly cleaning the floor, you start with a red pad to remove minor scuffs and then work your way up to finer pads. You keep the machine moving to avoid creating rings and check your progress frequently. Once finished, you apply a lithium densifier and buff it in with a white pad. The result is a renewed shine that enhances your living space.
Floor Scrubbers
What Is a Floor Scrubber?
A floor scrubber is an industrial cleaning machine designed to scrub, wash and sometimes dry hard floors. It typically features one or more rotating brushes or pads, a solution tank to apply cleaning fluid and a vacuum system that collects dirty water. Scrubbers come in walk‑behind models, which the user pushes, and ride‑on models, which include a seat for the operator. Walk‑behind scrubbers suit smaller or cluttered spaces, while ride‑on units cover large areas quickly.
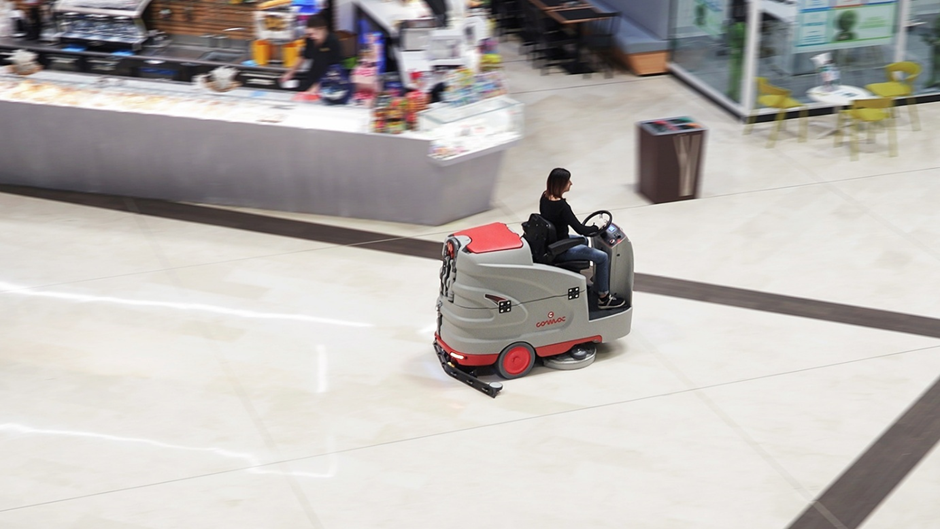
Ride‑on floor scrubber working in a shopping mall” by GiuliaVic is licensed under CC BY‑SA 4.0 and can be found at https://commons.wikimedia.org/wiki/File:Ride‑on_floor_scrubber.jpg
Uses and Applications
Homeowners may not immediately think of hiring a floor scrubber, but these machines are useful for large outdoor and indoor concrete surfaces:
- Cleaning large garages or workshops: If you have a sizable garage, workshop or shed where heavy vehicles or equipment are stored, a scrubber can deep clean the floor more efficiently than mopping.
- Patios and entertainment areas: Scrubbers remove dirt, spills and stains from patios or entertainment areas. They are especially useful after events or before applying sealers.
- Swimming pool surrounds: Concrete around pools can become slippery due to algae, sunscreen and pool chemicals. A scrubber with stiff brushes restores safety and cleanliness.
- Animal housing: If you have a small hobby farm or dog kennel, a scrubber cleans pen areas, reducing odours and bacteria.
What to Look for When Hiring
- Size of the area: Measure your space to determine the width of the scrubber. Walk‑behind units with 400–500 mm cleaning paths are suitable for residential use, while ride‑on machines may be overkill unless you have a very large property.
- Power source: Electric scrubbers (corded) require access to power outlets and are quieter, while battery‑powered versions offer mobility. Petrol or diesel machines exist but are typically used in commercial settings.
- Brush type: Scrubbers use disc brushes or cylindrical brushes. Disc brushes provide smooth, polished finishes and are good for flat surfaces, whereas cylindrical brushes have bristles that reach into grooves and uneven textures. Choose brushes appropriate for concrete and ensure they are stiff enough to remove grime.
- Solution and recovery tanks: Larger tanks reduce the frequency of refilling and emptying. A separate recovery tank collects dirty water for disposal.
- Vacuum system: A strong vacuum ensures floors dry quickly after scrubbing. Some scrubbers leave surfaces nearly dry, reducing slip hazards.
- Ease of manoeuvring: Look for ergonomic handles, adjustable speed settings and tight turning capabilities, especially if you have narrow spaces.
Tips for Using a Floor Scrubber
• Prepare the area: Remove loose debris by sweeping or vacuuming. Clear obstacles that could snag cords or hoses.
• Fill the solution tank: Use a cleaning product designed for concrete surfaces and follow dilution instructions. Avoid acidic or harsh chemicals that might damage the slab.
• Plan your route: Start from the farthest corner and move towards an exit. Work in overlapping passes to ensure uniform cleaning. For ride‑on machines, plan a path that avoids reversing or tight turns where possible.
• Adjust brush pressure: Too much pressure can wear brushes or scratch the concrete. Follow the manufacturer’s recommendations.
• Empty the recovery tank frequently: Dirty water builds up quickly. Empty and rinse the tank to maintain suction performance.
• Rinse the floor if necessary: After scrubbing, you may need to rinse with clean water to remove detergent residue, especially before sealing. Some scrubbers have rinse modes.
• Clean the machine: When finished, rinse brushes, flush tanks and wipe surfaces. Remove any debris trapped under the machine to prevent damage on the next use.
Example Scenario
You own a converted shed in your backyard that doubles as a games room and storage space. After a couple of messy DIY projects, the concrete floor is stained with paint drips, oil and dirt. You decide to hire a walk‑behind electric scrubber with a 450 mm disc brush. Filling the solution tank with a pH‑neutral cleaner, you make several passes across the floor. The scrubber vacuums up dirty water, leaving the surface nearly dry. After scrubbing and rinsing, the concrete looks revitalised, and the room is ready to host the next family gathering.
Floor Sweepers
What Is a Floor Sweeper?
A floor sweeper is a machine designed to remove dust, dirt and debris from hard surfaces. Unlike a vacuum cleaner that relies solely on suction, a sweeper typically uses rotating brushes to sweep particles towards the centre, where a suction system collects them into a hopper or bin. There are walk‑behind sweepers that resemble small push mowers and ride‑on sweepers suitable for large areas like carparks or warehouses.
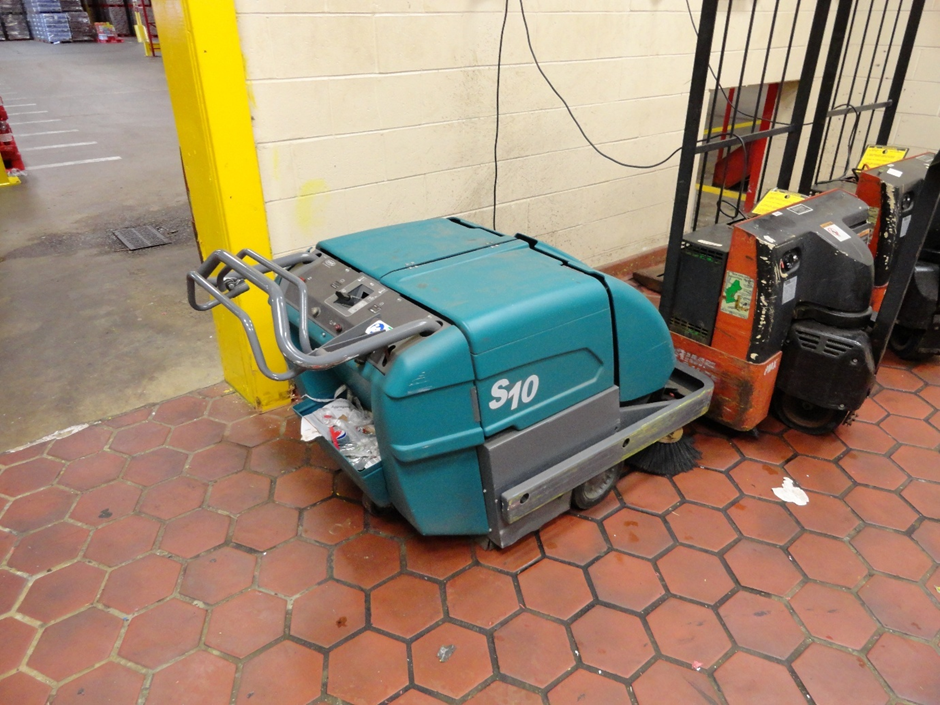
A floor sweeper (Tennant S10) being recharged at the Coca‑Cola Bottling Company of Cape Cod” by Kevin Rutherford is licensed under CC BY‑SA 4.0 and can be found at https://commons.wikimedia.org/wiki/File:Floor_sweeper.jpg
Uses and Applications
For homeowners, floor sweepers are useful in the following contexts:
- Cleaning large driveways: If you have a long driveway or a large concrete courtyard, sweeping by hand can be time‑consuming. A walk‑behind sweeper picks up leaves, dirt and gravel quickly.
- Garage and workshop floors: Sweepers remove sawdust, metal shavings and general debris, creating a tidy workspace.
- Courts and sport areas: Home tennis courts or basketball courts accumulate dust, leaves and small debris. A sweeper keeps the surface clean and safe.
- Paths and paving: Sweepers can be used on asphalt, pavers and even some external timber decks (with softer brushes) to remove debris without blowing dust everywhere as leaf blowers do.
How Sweepers Work
Most sweepers have several components:
• Side brushes: These circular brushes extend beyond the machine’s body and sweep debris inward. They reach into edges or along walls.
• Main brush: Located centrally, this brush sweeps the collected debris onto a conveyor or directly into a hopper.
• Vacuum or suction system: Many sweepers incorporate a vacuum to lift dust into a filter or bag, preventing it from being thrown back into the air.
• Filtering system: Filters (often polyester) capture fine particles. Some sweepers have filter shakers—mechanisms that shake the filter to dislodge dust back into the hopper so airflow isn’t restricted.
• Hopper or bin: This container collects the swept material. Some models allow easy removal and emptying without tools.
What to Look for When Hiring
- Size and capacity: Match the sweeper to the area you need to clean. For residential use, a walk‑behind sweeper with a hopper capacity of 30–50 litres is sufficient. For larger properties, a ride‑on unit with a larger hopper might be justified.
- Brush configuration: Side brushes are essential for collecting debris from edges. Ensure they are adjustable to reach edges without damaging surfaces.
- Power source: Manual push sweepers rely on the user’s effort to rotate brushes and are best for small areas. Battery‑powered units offer more consistent brush rotation. Petrol or diesel sweepers exist but are uncommon for homeowners.
- Dust control: Select a model with a vacuum and filter to reduce airborne dust. This is particularly important for indoor areas or asthma sufferers.
- Ease of manoeuvring: Look for adjustable handles, large wheels and tight turning capability. Check the machine’s weight, especially if you need to move it up steps or between different areas.
- Maintenance and emptying: Choose a sweeper with an easily removable hopper and accessible filters. Some ride‑on sweepers have high‑dump bins that lift and tip debris into a skip or bin.
Tips for Using a Floor Sweeper
• Clear large obstacles: Remove large debris like branches, stones or tools before sweeping. Sweepers handle small debris; large items could jam the brushes.
• Adjust brush height: Many sweepers allow you to adjust brush pressure. Too much pressure wears brushes quickly and may scratch surfaces; too little pressure leaves debris behind.
• Overlap passes: Sweep systematically, overlapping slightly for thorough coverage. Empty the hopper before it becomes too full, as overfilling reduces efficiency.
• Check filters: If your sweeper has a filter shaker, use it periodically to maintain suction. Replace or clean filters as recommended.
• Store properly: After use, empty the hopper, clean the brushes and store the sweeper in a dry place. Wet debris left in the hopper can create odours or corrosion.
Example Scenario
You have a large paved driveway and an adjoining carport that regularly collects leaves, dust and gravel. Instead of endless sweeping with a broom, you hire a walk‑behind battery sweeper. Over the weekend, you push the sweeper along paths and the carport. The side brushes sweep leaves inward, while the main brush and vacuum lift debris into the hopper. Within an hour, the area is tidy and ready for a family gathering. You simply remove the hopper and tip the waste into your green bin.
Grout Pumps
What Is a Grout Pump?
A grout pump is a mechanical device used to inject grout—a mixture of cement, water and sometimes sand or additives—into voids, cracks or holes to strengthen structures or fill gaps. Grout pumps range from small hand‑operated units to large electric or pneumatic machines. They allow precise placement of grout at controlled pressures, ensuring cavities are fully filled without creating air pockets. In residential contexts, grout pumps are used to repair cracks, stabilise soil or fill voids beneath slabs.
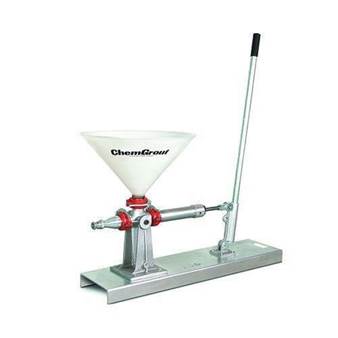
Image Source: Dynamic Hire https://www.dynamichire.net.au/product-tag/grout-pump-hire/
Uses and Applications
- Crack repair: When concrete slabs develop cracks, injecting grout can restore structural integrity. The grout flows into the crack, bonding broken pieces together and filling voids.
- Void filling: Over time, voids can form beneath driveways or around pools due to erosion or poor compaction. Pumping grout fills these voids, preventing settlement or collapse.
- Soil stabilisation: In areas with loose soil, grout can be injected into the ground to increase bearing capacity before building a patio or deck. This technique is common in underpinning work.
- Water seepage control: Injecting grout into cracks or joints can stop water infiltration in retaining walls or basements. Grout forms a watertight barrier.
What to Look for When Hiring
- Type of pump: Grout pumps can be manual lever‑type, electric piston pumps or pneumatic pumps. For small DIY repairs, a manual or small electric pump is adequate. For larger void filling, a more powerful electric pump with higher flow capacity may be needed.
- Pressure and flow control: A pump with adjustable pressure ensures grout flows into voids without blowing out joints. Flow rate determines how quickly material can be placed.
- Hose and nozzle options: Different nozzle sizes and configurations allow for precise delivery into cracks or injection ports. Make sure the hose length reaches the application area.
- Material compatibility: Grout varies in viscosity (thickness). Ensure the pump can handle the mix design you plan to use. Some pumps are designed for cementitious grout, while others can pump epoxy or chemical grouts.
- Portability: Pumps vary in weight. For small repairs, choose a portable unit that can be carried easily. For larger jobs, check if the hire company includes a trolley.
- Mixing equipment: Some hire packages include a mixer to prepare grout. If not, you’ll need to hire or supply your own mixing container and paddle.
Tips for Using a Grout Pump
• Prepare the area: Clean the crack or void by removing loose debris, dust or any unstable material. If injecting into cracks, you may need to install injection ports (small fittings) at intervals along the crack.
• Mix grout correctly: Follow the manufacturer’s ratios. Too much water weakens the grout and increases shrinkage. Too little water makes pumping difficult. Mix until the grout is homogeneous and free of lumps. Use additives such as plasticisers or expansive agents if recommended for your application.
• Prime the pump: Run a small amount of clean water or mixed grout through the pump to remove air and ensure smooth operation. Check for leaks or blockages.
• Pump slowly: Start pumping at low pressure to fill voids gradually. Watch for grout appearing at adjacent ports or cracks, indicating the void is full. Stop when material flows consistently and begins to set.
• Seal the surface: After pumping, cap injection ports and seal the crack surface with grout or epoxy to prevent future water ingress.
• Clean equipment: Immediately after use, flush the pump with water to prevent grout from hardening inside the pump or hoses. Disassemble nozzles and clean thoroughly.
Example Scenario
Your pool deck has developed a sunken section due to soil erosion beneath the slab. The concrete hasn’t cracked, but it flexes when stepped on. You hire a small electric grout pump along with a paddle mixer. After drilling 20 mm holes at intervals across the affected area, you mix a flowable cement grout and attach the pump hose to each hole. Slowly injecting grout fills the void until the grout seeps from adjacent holes. After finishing, you plug the holes with concrete and let the grout cure. The deck is solid again, and you avoided replacing the entire slab.
<iframe src=”https://smallbiztools.com.au/_embed/Q4AF3GJEFT?d=deployment-b9e767e9-2633-44c8-b219-ac0252fc0124″style=”width: 100%; height: 500px; max-width: 700px; border-radius: 4px;” frameborder=”0″></iframe>
Scarifiers
What Is a Scarifier?
A concrete scarifier (also known as a surface planer or milling machine) is a machine that removes concrete from the surface using rotating drums fitted with multiple flails or cutters. These cutters chip away at the concrete, creating a rough texture. Scarifiers are used to remove coatings or high spots more aggressively than grinders. They can cut 3–6 mm per pass, depending on the machine and cutters used.
Compact scabbler machine” by Mark Kilby is licensed under CC BY‑SA 3.0 and can be found at https://commons.wikimedia.org/wiki/File:Compact_scabbler_machine.ogv
Uses and Applications
- Removing thick coatings: Some driveways or garage floors may have thick epoxy, elastomeric or tar coatings. A grinder could take hours to remove these; a scarifier strips them quickly.
- Levelling trip hazards: Where slab sections have lifted due to tree roots or subsidence, scarifiers can mill down the high edge to create a ramp instead of cutting out and replacing the slab.
- Texturing surfaces: Scarifiers create a non‑slip profile that improves traction on ramps, around pools or on steep driveways. The rough finish also provides a better bonding surface for overlays or new toppings.
- Grooving for drainage: Scarifiers can cut grooves in concrete to channel water away or improve grip.
What to Look for When Hiring
- Cutting depth and width: Small handheld scarifiers cut narrow strips and shallow depths (3–5 mm). Walk‑behind units cover wider paths (100–300 mm) and can be set to different depths. Choose a machine based on the area size and material to remove.
- Power source: Electric scarifiers are common for indoor or residential use because they produce no exhaust. Petrol scarifiers offer more power for outdoor projects but are heavier and louder.
- Cutter type: Scarifiers use different cutters (tungsten carbide or steel flails). Tungsten carbide cutters are aggressive and long‑lasting; steel cutters wear faster but cost less. Some hire companies let you choose depending on the job.
- Dust control: Because scarifying creates a lot of dust and debris, ensure the machine has a vacuum attachment or dust shroud. Connect it to a dust collector to reduce airborne silica dust.
- Ease of height adjustment: Look for easy‑to‑use levers or knobs to set cutting depth. Precise adjustment helps avoid removing too much concrete.
- Maintenance: Inspect the machine for worn or missing cutters. Ask the hire company about replacement cutters or wear charges.
Tips for Using a Scarifier
• Mark areas to be removed: Use chalk or tape to outline high spots or coatings. This ensures you remove material only where needed.
• Start at the shallow setting: Begin with a shallow depth and make multiple passes, gradually deepening the cut. This reduces the risk of gouging or removing too much material.
• Push steadily: Maintain a consistent speed. Do not force the machine forward; let the cutters do the work. For handheld scarifiers, keep your hands firmly on the handles and maintain balance.
• Watch for cords: Secure the power cord or vacuum hose so you don’t trip or cut them.
• Wear appropriate PPE: Scarifiers are loud and vibrate considerably. Wear hearing protection, gloves and eye protection. Safety boots protect against dropped debris or contact with the cutters.
• Clean up thoroughly: Scarifying leaves a rough finish with debris. Vacuum or sweep up and assess if further grinding is necessary to achieve the desired texture.
Example Scenario
Your driveway has a coating of rubberised waterproofing applied by the previous homeowner. It has deteriorated, making the surface slippery. Using a grinder would take days to strip the thick coating. Instead, you hire a walk‑behind electric scarifier. After marking the driveway into sections, you set the machine to a 3 mm cutting depth and begin milling away the coating. Within a day, you remove the majority of the material. You then switch to a grinder to smooth the surface and prepare it for a new decorative coating.
Floor Scrapers
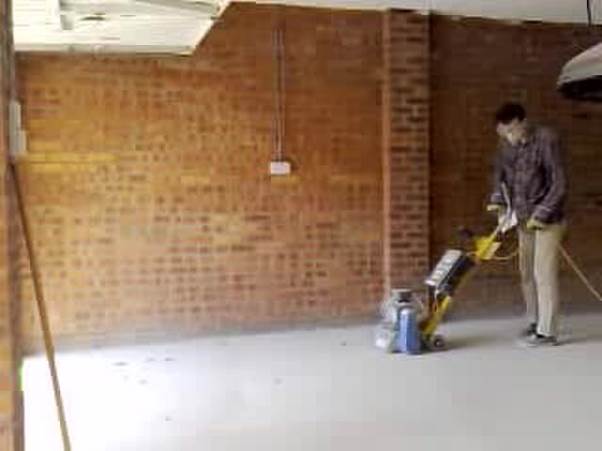
What Is a Floor Scraper?
A floor scraper is a tool used to remove old floor coverings or adhesives. It consists of a handle and a sharp blade angled to slide under materials, lifting them from the substrate. There are manual scrapers with long handles and mechanised scrapers (electric or battery‑powered) for larger or tougher jobs. The blade may be replaceable and comes in different widths and configurations. Floor scrapers are essential for preparing concrete slabs for new flooring.
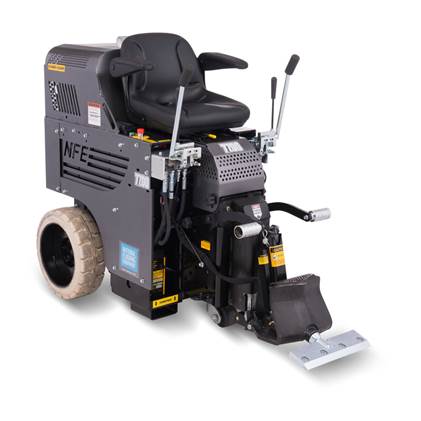
Image source: https://www.dynamichire.net.au/product-tag/floor-scraper-hire/
Uses and Applications
- Removing tiles: Ceramic or vinyl tiles glued to concrete can be stubborn. A floor scraper helps pry them up, separating the adhesive bond.
- Stripping carpet and underlay: Old carpet stuck with adhesive or foam underlay must be scraped off before installing new flooring. A sharp scraper blade slices through the old adhesive.
- Removing vinyl or linoleum: Sheet vinyl and linoleum often have glue that remains on the slab. Scrapers lift the sheet and then scrape away the adhesive residue.
- Scraping paint or epoxy: If a garage floor has peeling paint or epoxy, a floor scraper assists in removing flaking areas.
- Removing thin mortar: After removing tiles, thinset mortar may remain. A mechanised scraper can chip it off quickly.
Types of Floor Scrapers
• Manual long‑handled scrapers: These have a blade (usually 150–200 mm wide) attached to a long handle. The user exerts force to push or pull the blade under flooring. They’re ideal for small areas, corners or tight spaces. Blades can be replaced when dull or when switching to different flooring types.
• Mechanised floor scrapers: Also called floor stripper machines, these are powered units with a reciprocating blade. They move forward automatically while the blade vibrates, making it easier to remove glued flooring over larger areas. Some models run on electricity while others are battery‑powered for cordless use.
What to Look for When Hiring
- Area size and flooring type: For small rooms or patch removal, a manual scraper is sufficient. For larger areas or thick adhesives, consider a mechanised scraper to save time and effort.
- Blade width and type: Wider blades cover more area but may struggle to get under heavy tiles. Narrower blades concentrate force for tough adhesives. Some blades are rigid; others are flexible. Choose a blade appropriate for the flooring you’re removing. Ask the hire company for advice.
- Comfort and ergonomics: If you’ll be scraping for hours, choose a scraper with an adjustable handle and comfortable grip. Mechanised scrapers should have handles that reduce vibration and easy‑to‑use controls.
- Weight and portability: Mechanised scrapers can be heavy. Ensure you can move the machine through doorways or up steps. Some come with transport wheels or a separate trolley.
- Power source: Electric scrapers require a power point and a heavy‑duty extension lead. Battery scrapers offer mobility but may need recharging or spare batteries for extended use.
Tips for Using a Floor Scraper
• Score the surface: For vinyl or sheet flooring, score it into strips using a utility knife. This makes it easier for the scraper blade to get underneath.
• Work at the right angle: Hold the scraper at a low angle (about 30–45 degrees) to the floor. Too shallow, and it won’t dig in; too steep, and the blade may gouge the concrete.
• Apply consistent pressure: Use your body weight rather than just your arms to push the scraper. For mechanised scrapers, guide the machine steadily rather than forcing it.
• Keep blades sharp: Replace dull blades; a sharp edge makes the job easier and reduces the chance of damaging the slab. Keep extra blades on hand.
• Remove adhesive residue: After lifting flooring, adhesive may remain. Use a smaller hand scraper or solvent to remove any stuck patches. Grinding or sanding may follow for final preparation.
• Safety gear: Wear gloves to avoid blisters and safety glasses to protect against flying debris. Knee pads can make the job more comfortable if you need to work close to the floor.
Example Scenario
You’re renovating your kitchen, which has dated vinyl flooring glued to a concrete slab. You decide to install new vinyl planks, but first you must remove the old flooring. You hire a manual floor scraper with a 200 mm blade. After scoring the vinyl into strips, you wedge the scraper blade under one corner and push steadily. By taking breaks and replacing the blade when it dulls, you remove the vinyl and glue over two days. A final pass with a small hand scraper and solvent cleans up remaining adhesive. The slab is now ready for the new planks.
General Tips for Hiring Concrete Equipment
Do Your Research
Even though this information provides guidance, it’s wise to research the specific equipment you intend to hire. Read user manuals, watch instructional videos and ask the hire company for advice. The more familiar you are with the machine’s operation and safety precautions, the better your results will be.
Compare Hire Companies
Rates and service levels vary. Compare multiple hire companies in your area. Ask about delivery fees, hire duration options, included accessories (e.g., vacuum hoses, blades, polishing pads), wear charges and insurance. Check reviews and ask neighbours or friends for recommendations.
Inspect Equipment Before Hiring
When you pick up the equipment (or when it’s delivered), inspect it for any damage or wear. Ensure that guards are intact, switches operate correctly and accessories are included. Clarify any existing damage so you’re not held responsible when returning the equipment.
Ask About Safety and Training
Many hire shops offer brief demonstrations. Take advantage of this and ask questions. The staff should explain start‑up procedures, safe operation, and troubleshooting. Ask about required personal protective equipment and whether the hire company provides any of it.
Consider Insurance
Check whether your home insurance covers hired equipment or whether the hire company offers insurance. Accidents can happen, and replacement or repair of expensive machines can be costly. Hiring with insurance can protect your investment.
Plan Your Project
Organise your project schedule so you use the hired equipment efficiently. This might involve clearing the area, coordinating other trades (e.g., electricians or plumbers), and ensuring weather conditions are suitable (especially for outdoor grinding or painting). Wasting hire time because of poor planning can increase costs.
Prepare Your Home
• Protect surroundings: Grinding, cutting or scarifying produces dust and vibrations. Move fragile items, cover nearby plants and tape plastic over doors and vents to contain dust.
• Provide power and water: Ensure power points are accessible and supply enough amperage for the machine. For wet cutting or polishing, have a water tap nearby and appropriate hoses.
• Check weather: For outdoor projects, avoid rainy days for tasks that require dry conditions like grinding or applying coatings.
Use Correct PPE
Always wear appropriate personal protective equipment. At a minimum, use safety glasses, hearing protection, gloves, sturdy closed‑toe shoes or boots, and a respirator or dust mask rated for silica. High‑visibility clothing is useful if working near traffic (e.g., at the front of your property). A hard hat may be required if working under overhead structures.
Work Safely
• Follow manufacturer instructions: Each machine has specific guidelines. Always read the manual and follow the recommended procedures.
• Secure cords and hoses: Keep cords and hoses away from the cutting or grinding path. Use cord covers to prevent tripping hazards.
• Stay alert: Many machines produce high noise levels and vibrations. Take frequent breaks to avoid fatigue and maintain concentration. Switch off equipment when adjusting or changing accessories.
• Ventilate: For petrol machines or tasks involving fumes, work in well‑ventilated areas. Avoid enclosed spaces to prevent build‑up of carbon monoxide or dust.
• Dispose of waste responsibly: Concrete dust and slurry should not go down stormwater drains. Collect and dispose of waste according to local council guidelines.
Clean and Return Equipment
Return hired equipment clean and in good condition. Clean off dust, slurry or mud and pack accessories neatly. Report any issues or damage. This not only ensures you avoid cleaning fees but also maintains a good relationship with the hire company.
Concrete equipment Hire Companies
Sydney – Dynamic Hire
Dynamic Hire Sydney is a standout specialist in concrete surface preparation, offering an expansive range of reliable, up-to-date equipment. Whether you’re working on a renovation, construction, or restoration, their knowledgeable team, flexible hire periods, and option for delivery make them a valuable hire partner. Led by a seasoned expert with nearly 30 years in the trade, they truly combine both deep industry insight and top-tier gear to help you finish your job efficiently and to the highest standard.
Key Equipment Available for Hire
| Equipment Category | Examples & Highlights |
|---|---|
| Concrete Surface Preparation | Concrete grinders, burnishers, scrapers, mowers & sanders |
| Concrete Cutting, Sawing & Drilling | Walk-behind saws, handheld saws, brick saws, chainsaws, core drills, crackchasers, demolition saws and hammers |
| Concrete Demolition | Jackhammers (light to heavy), trolley-mounted demolition hammers, hydraulic crushers and splitters |
| Dust Control | Industrial wet/dry vacuum cleaners, HEPA dust collectors, air cleaners, exhaust fans, and dust control tents |
| Other Equipment | Floor polishers, scrubbers, sweepers, grout pumps, mixers, pressure washers, scarifiers, generators, power packs, repair tools, sealers, densifiers, diamond tooling |
Explore the full range and plan your next hire here: https://www.dynamichire.net.au/
Melbourne: Smart Hire Concrete Care
Smart Hire Concrete Care in Oakleigh South, Melbourne, is a trusted destination for professionals and DIYers seeking reliable hire tools for concreting, surfacing, and demolition projects. Whether you’re preparing, polishing, or removing, their friendly team is ready to guide you toward the right tools at competitive prices.
Explore their full equipment range and plan your next hire here: https://smarthireconcretecare.com.au/
Perth: Concrete Hire (Perth)
Concrete Hire is a family-owned Western Australian specialist with over 20 years of experience in the concrete preparation and remedial industry. They pride themselves on offering specialised concrete equipment, friendly and efficient customer service, and affordable pricing. Whether you’re tackling a large commercial development or a smaller domestic job, they provide the right tools—with delivery anywhere in Metro Perth—to keep your project on time and on budget.
Explore their full range and hire options here: https://www.concretehire.com.au/
Canberra: Asset Construction Hire
Asset Construction Hire is a locally owned and trusted provider of equipment hire services in Canberra and Queanbeyan, specialising in elevated work platforms and a broad range of trade and construction gear. Boasting over a decade of experience (since 2010), their team brings deep industry knowledge with a friendly, solution-first attitude—especially valued by clients who prioritise reliability and expert support.
Explore their full suite of equipment and hire solutions here: https://www.assethire.com.au/
Adelaide: Statewide Hire
Statewide Hire is a South Australian, family-owned provider of construction and trade equipment hire, operating since 1999. With over 26 years of experience and a highly accessible location in Newton, they offer same-day delivery across Metropolitan Adelaide and the Hills. Their friendly, knowledgeable staff and well-maintained machinery ensure dependable support for civil, trade, retail, and landscaping clients throughout South Australia.
Explore their full range and arrange your next hire here: https://www.statewidehire.com.au/
Brisbane: Centenary Hire
Centenary Hire is a family-owned and operated business, serving Brisbane and surrounding areas since 1981. Based in Sumner Park, they’ve built a strong reputation for exceptional customer service, reliable delivery, and a growing fleet of modern, well-maintained hire equipment. Whether you’re a homeowner, a tradesperson, or running a commercial project, they’re known for helping you simply get the job done—on time and on point.
Explore their full equipment catalog and plan your next hire here: https://centenaryhire.com.au/
Sources
Key references include articles on concrete grinding techniques and safety
- Dynamic Hire Sydney
- https://www.dynamichire.net.au/
- kennards.com
- nortonabrasives.com
- statefarm.com
- flooringmaterials.co.uk
- concretenetwork.com
- groutcleaner.com
- blog.lavor.com
Some Images from Dynamic Hire Sydney


.jpg)