Installation Techniques for Bird Netting: Step-by-Step Instructions
Importance of Bird Netting
Bird netting might not seem like a glamorous topic, but its importance can’t be overstated. Imagine spending months nurturing your crops, only to have them ravaged by birds in a matter of days. Or consider the unsightly and potentially damaging mess bird droppings can make on buildings. Bird netting is a simple, effective solution to bird problems, providing a barrier that protects both agricultural investments and structural integrity.
Moreover, bird netting has environmental benefits. It offers a humane way to deter birds without harming them, maintaining the balance of local ecosystems while safeguarding human interests.
Preparation
Assessing the Area
Before diving into installation, it’s crucial to properly assess your area. Where are the problem spots? Are birds frequenting your fruit trees, or is it your vegetable patch that’s under attack? Identifying these areas will help you determine the size and type of netting you need.
Next, measure the space. Accurate measurements are key to buying the right amount of netting and ensuring a snug fit. Measure the width, length, and height of the area you need to cover. Don’t forget to account for any obstacles that might require additional adjustments.
Selecting the Right Materials
Types of Bird Netting
Choosing the right netting depends on your specific needs. Here are the main types:
- Heavy-duty netting: Ideal for larger birds and more extensive coverage. It’s durable and can withstand harsh weather conditions.
- Lightweight netting: Suitable for smaller birds and less aggressive weather. It’s easier to handle and install but might not last as long as heavy-duty options.
- UV-resistant netting: This is treated to resist sun damage, extending the lifespan of the netting, especially in sunny climates.
Additional Tools and Accessories
Beyond the netting, you’ll need several tools and accessories:
- Poles and frames: These provide the structure to support the netting. They need to be sturdy and well-placed.
- Fasteners and ties: These are used to secure the netting to the poles and ensure it stays in place.
- Safety equipment: Gloves, safety glasses, and possibly a hard hat, depending on the installation height and complexity, are essential to protect yourself during the process.
Installation Techniques
Pre-installation Steps
Clearing the Area
Clear any debris, branches, or other obstacles from the installation area. This ensures a smoother installation process and a cleaner finish.
Gathering Necessary Tools
Have all your tools and materials ready before you start. This includes the netting, poles, fasteners, ties, and safety equipment. Having everything at hand will save you time and effort.
Planning the Installation Layout
Plan out where you’ll place your poles and how you’ll drape the netting. Consider factors like wind direction and the natural flow of water to ensure your netting will stay secure and effective.
Installing the Support Structure
Erecting Poles and Frames
Start by installing the poles and frames. Make sure they are firmly planted and stable. The poles should be tall enough to cover your crops or protect your building without leaving gaps at the bottom.
Ensuring Stability and Proper Alignment
Use a level to ensure the poles are straight. Stability is crucial; wobbly poles can compromise the entire setup, especially in windy conditions.
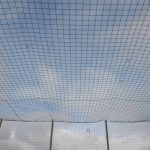
Attaching the Netting
Unrolling and Positioning the Netting
Unroll the netting and position it over the area to be covered. It’s often easier to do this with a partner, especially for larger areas.
Securing the Edges
Secure the edges of the netting using clips or ties. Make sure the netting is taut but not overly stretched, as this can cause it to tear.
- Using clips and ties: Attach the netting to the poles using clips or zip ties. Space them evenly to ensure the netting stays in place.
- Avoiding gaps and sagging: Check for any gaps where birds could sneak through. Tighten any sagging sections to maintain a uniform cover.
Connecting Multiple Netting Sections
If you’re covering a large area, you might need to connect multiple sections of netting.
- Overlapping and joining techniques: Overlap the edges of the netting sections and secure them together with additional clips or ties.
- Ensuring a seamless cover: Check the joins for gaps and ensure the entire area is uniformly covered.
Post-Installation
Inspection and Adjustments
Checking for Gaps and Weaknesses
After installation, thoroughly inspect the netting. Look for any gaps or weak spots where birds could get through.
Making Necessary Adjustments
Tighten or reposition the netting as needed to ensure a secure fit.
Maintenance Tips
Regular Inspections
Regularly inspect the netting for wear and tear, especially after storms or high winds.
Cleaning and Repairs
Keep the netting clean and free of debris. Repair any holes or tears promptly to maintain its effectiveness.
Safety Considerations
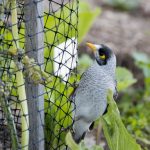
Ensuring Bird Safety
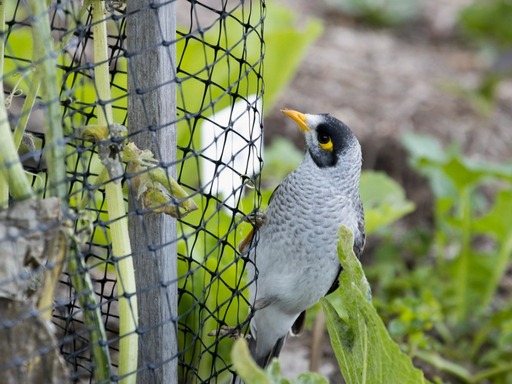
Check the netting periodically to ensure no birds are trapped. Make adjustments as necessary to prevent harm.
Worker Safety Tips
Always use appropriate safety gear when installing or maintaining the netting. Be mindful of your surroundings and any potential hazards.
Common Challenges and Solutions
Dealing with Uneven Terrain
Techniques for Sloped Areas
For sloped areas, adjust the height of your poles to maintain an even cover. You may need additional poles for extra support.
Adjusting for Obstacles
Work around obstacles by cutting the netting to fit and securing it tightly around the obstruction.
Preventing Damage from Weather
Reinforcing Netting for High Winds
Use additional ties or clips in windy areas to secure the netting better. Consider using heavier-duty netting if wind is a frequent issue.
Protecting Against UV Degradation
Opt for UV-resistant netting if your installation is in a sunny area to prolong its lifespan.
Addressing Persistent Bird Problems
Additional Deterrents
Combine netting with other bird deterrents like reflective tape or sound devices for stubborn bird issues.
Monitoring and Adapting Strategies
Keep an eye on bird activity and adapt your strategies as needed. Sometimes combining multiple methods provides the best results.
Conclusion
Recap of Key Points
Proper installation of bird netting involves careful planning, selecting the right materials, and thorough post-installation checks. It’s a practical, humane way to protect your investments.
Encouragement to Follow Guidelines for Successful Installation
Following these guidelines ensures a successful installation, providing long-term protection for your crops or buildings.
Final Tips and Recommendations
Always use quality materials and regularly maintain your netting. Small, consistent efforts can save you significant time and resources in the long run.
FAQs
A. Addressing Common Questions and Concerns
How long does bird netting last?
With proper maintenance, quality bird netting can last up to 5-10 years.
Can bird netting be reused?
Yes, if it’s in good condition, bird netting can be removed, stored, and reused.
Is bird netting safe for birds?
Properly installed bird netting is safe and humane. Regular inspections help ensure no birds are trapped.
Providing Expert Advice and Solutions
For more detailed advice, consider consulting a professional installer or seeking guidance from your local agricultural extension office.
Read more about Bird Netting
- Choosing the Right Bird Netting: A Comprehensive Guide
- Choosing the Right Bird Netting Material: A Comprehensive Guide
- The Environmental Impact of Bird Netting: Balancing Wildlife Protection and Human Needs
- Top Benefits of Using Bird Netting in Agriculture and Horticulture
- Common Mistakes to Avoid When Installing Bird Netting
- Innovative Bird Netting Solutions for Urban Areas
- The Legal Aspects of Bird Netting: Regulations and Best Practices
- Maintenance and Longevity of Bird Netting: Keeping Your Netting Effective
- Comparing Bird Netting with Other Bird Control Methods: Pros and Cons