Insulation Guide for Homeowners – Warm and Dry Homes in the Central Plateau of New Zealand
New Zealand’s Central Plateau is known for its stunning landscapes, cool winters and crisp mornings. While our climates bring unique charm, they also mean our homes can get very cold and damp if not properly insulated. Insulation is not just about energy efficiency – it is about creating healthier, warmer and drier living spaces that improve our well‑being and reduce our environmental footprint. In the Taupo, Rotorua and Tokoroa regions, homeowners face similar challenges: maintaining comfortable temperatures during frosty winters and hot summers, reducing energy costs and preventing moisture problems that lead to mould and structural issues. This article has been created to help you understand insulation from the ground up.

What You Will Learn
- Why insulation matters: the science of heat transfer, health benefits and cost savings.
- How different parts of your home lose heat and the best ways to insulate them.
- The types of insulation materials available and their performance for New Zealand conditions.
- Government grants and programmes that can subsidise your insulation project.
- How to plan an insulation project and what to expect from a professional installation.
- Why Easy Insulation is trusted by homeowners and landlords across Taupo, Rotorua and Tokoroa.
- Let’s begin by understanding why insulation is so crucial for comfort, health and energy efficiency in our homes.
1. Understanding Heat Loss and Insulation Fundamentals
1.1 Heat Loss in Homes
Heat naturally flows from warmer areas to cooler areas. In winter, heat generated inside your home escapes to the outside; in summer, hot air enters. Uninsulated or poorly insulated homes lose heat primarily through the roof, walls, floors and windows. Research from BRANZ (Building Research Association of New Zealand) shows that in an uninsulated timber‑framed house around 30–35 % of heat escapes through the roof, 18–25 % through the walls and 21–31 % through windows. Without proper insulation, your heating system must work harder and your home remains chilly and damp.
Understanding the mechanisms of heat transfer helps explain how insulation works:
- Conduction is heat transfer through direct contact. Materials like metals have high thermal conductivity, while materials with trapped air (such as insulation batts) have low conductivity.
- Convection is heat transfer through moving fluids or gases. Warm air rises and cool air sinks, creating convection currents. Insulation slows down these air movements by using small air pockets.
- Radiation is heat transfer through electromagnetic waves. Warm objects radiate heat energy; reflective insulation materials have shiny surfaces that reduce radiant heat transfer.
Insulation reduces heat transfer by all three methods. Bulk insulation traps air pockets to reduce conduction and convection, while foil or reflective surfaces reduce radiation. When insulation is installed correctly, it provides a continuous thermal envelope that minimises heat loss and gains, maintains stable indoor temperatures and helps prevent moisture problems.
1.2 R‑Values and Thermal Performance
Insulation performance is measured by its R‑value (thermal resistance). The higher the R‑value, the greater the resistance to heat flow. R‑value depends on the material’s thermal conductivity (λ) and thickness; mathematically R = thickness divided by λ. A thicker layer of insulation or a material with lower thermal conductivity increases the R‑value.
In New Zealand, different climate zones have minimum R‑value requirements for new buildings. Since May 2023 the New Zealand Building Code has increased roof insulation requirements to around R6.6, doubled from previous values (R2.9). Wall insulation requirements have increased to R2.0 and floor insulation to R1.5‑R3.0 depending on the floor type. For existing homes, recommended R‑values for retrofitting are slightly lower but still substantial: ceilings R3.3–R6.0 and underfloors R1.3–R1.6. Installing higher R‑values improves comfort, saves energy and future‑proofs your home against future code changes.
1.3 Moisture, Mould and Health
Poor insulation often leads to cold surfaces that encourage condensation. When warm moist air contacts cold walls or floors, water vapour condenses, causing dampness and mould growth. Mould can trigger respiratory problems, aggravate asthma and weaken immune systems. Ground moisture rising through floors is another common problem in older homes; it can create damp air and musty smells. A ground moisture barrier and adequate underfloor insulation reduce moisture ingress and improve indoor air quality.
Maintaining a warm and dry home is not just about comfort; it is about health. Cold homes increase the risk of respiratory illnesses and cardiovascular problems. Insulation helps maintain stable temperatures, reduces humidity and contributes to healthier living environment. The New Zealand Government’s Healthy Homes Standards recognise this by requiring adequate insulation, heating, ventilation and moisture control in rental properties. Landlords must ensure ceiling and underfloor insulation meet at least 120 mm thickness (or R3.3 in some areas) by 1 July 2025.
1.4 Energy and Cost Savings
Energy bills make up a significant portion of household expenditure. Without insulation, much of your heating energy is wasted; with insulation, the energy stays inside. Insulated homes require less heating to maintain comfortable temperatures, leading to lower power bills. According to research, installing ceiling insulation alone can reduce heat loss by up to 30 %. A well‑insulated house maintains warmth longer, enabling you to heat your home less frequently or at lower settings. During summer, insulation also keeps homes cooler by slowing heat transfer from outside.

Beyond direct cost savings, insulation enhances the value of your property. Prospective buyers and tenants increasingly seek healthy, energy‑efficient homes. A well‑insulated house is a strong selling point and contributes to a higher Home Star rating and compliance with the Healthy Homes Standards. Insulation is a long‑term investment that pays dividends in comfort, health and property value.
2. Insulating Different Parts of the Home
The structure of a home comprises multiple components – roof, walls, floors and foundations. Each has distinct heat loss characteristics and requires different insulation strategies. In this chapter we explore the importance of insulating each part, recommended materials and installation tips.
2.1 Ceiling Insulation
The roof or ceiling area is responsible for the largest proportion of heat loss in most homes. Warm air rises, and without adequate insulation it escapes through the roof. Easy Insulation emphasises that ceiling insulation reduces energy bills, improves comfort, creates a healthier environment by reducing dampness and mould, reduces noise transmission and can even increase property value. In addition to heat retention, a thick blanket of insulation dampens external noises such as rain or traffic.
2.1.1 Types of Ceiling Insulation
New Zealand typically uses the following ceiling insulation products:
- Glasswool batts or segments: Flexible pre‑cut pieces made from recycled glass and sand. Products such as Pink Batts, Earthwool and Bradford Gold are widely used. They trap air within fine fibres, providing good thermal and acoustic performance.
- Polyester insulation: Made from recycled plastic bottles (PET). Brands like Mammoth, GreenStuf and Terafloor produce polyester insulation that is soft, non‑itchy and non‑allergenic, making installation easier and safer. Polyester products often have high recycled content and maintain thermal performance even if slightly compressed.
- Loose‑fill insulation: Materials like cellulose or wool fibres can be blown into ceiling cavities. Loose‑fill is useful for retrofit projects where batts are impractical. However, the insulation must be installed evenly and to the correct thickness.
- Spray foam insulation: Expanding foam applied to the underside of the roof. It provides excellent air sealing but is less common in New Zealand due to cost and potential moisture issues.
2.1.2 Installation Considerations
Professional installation is key to ensuring your insulation performs as advertised. Poorly installed insulation leaves gaps, compresses material and reduces R‑value. The Gen Less guidance recommends hiring Insulation Association of New Zealand (IAONZ) members and ensuring proper coverage around downlights, ventilation ducts and eave vents. Always check that existing insulation is not wet, mouldy or compressed; it may need replacement. In homes with complex roofs or limited access, professionals can ensure safe installation and avoid damaging wiring or roof structure.
During installation, your installer should also check for adequate ventilation in the roof cavity. Ventilation prevents moisture build‑up and extends the life of both insulation and roof materials. Additionally, ensure that any downlights or heating elements in the ceiling are rated for contact with insulation (IC or IC‑F rated) and that safe clearance is maintained around heat‑producing fixtures.
2.2 Wall Insulation
Insulating walls dramatically reduces heat loss and improves comfort. According to Gen Less, an uninsulated weatherboard wall has an R‑value of around R0.5, but with insulation this can increase to R1.8–R2.4. Walls make up a large surface area of your home and can lose around 18–25 % of heat if left uninsulated.
2.2.1 Types of Wall Insulation
Glasswool or polyester batts: Similar to ceiling batts but narrower to fit between wall studs. They are installed during construction or renovation when wall linings are removed. Batts are cost‑effective and provide consistent performance.
Blown‑in or injected insulation: For existing walls where removing linings is not practical, insulation can be injected through small holes drilled from the inside or outside. Materials may include cellulose fibre, loose glasswool or polystyrene beads. Proper installation ensures the cavity is completely filled and that moisture barriers and wiring are protected.
Foam insulation: Expanding foam can be injected into wall cavities. It offers excellent air sealing but requires professional installation and careful assessment to avoid moisture issues.
2.2.2 Installation Considerations
When retrofitting insulation, check for building consent requirements (especially in heritage or structural walls) and confirm the wall’s weather‑tightness. Gen Less emphasises the importance of sealing draughts and ensuring vapour barriers are intact to prevent moisture migration. Installation should avoid compressing insulation or leaving gaps around plumbing and wiring. For injection systems, ensure the installer uses proper fill density and monitors moisture levels. Professional assessment ensures that insulation will not create condensation inside the wall cavity.
2.3 Underfloor Insulation
Cold floors can be uncomfortable and contribute to heat loss. Underfloor insulation keeps heat inside and prevents cold air from seeping up through the floorboards. Easy Insulation highlights benefits such as reduced energy bills, improved comfort (no more cold feet), moisture control and a healthier living environment.

2.3.1 Types of Underfloor Insulation
Bulk insulation: Materials such as polyester, glasswool or polystyrene boards are fitted between floor joists. These products come in rolls or pre‑cut mats and provide consistent coverage. Look for products that meet the AS/NZS 4859.1 standard, have sufficient width to stay snugly in place and are rated R1.4 or higher.
Rigid boards: Expanded polystyrene (EPS) or extruded polystyrene (XPS) boards are used under concrete slabs and in new builds. They provide higher R‑values (up to R2.8 or greater) and are moisture resistant.
Foil insulation: Foil products reflect radiant heat but have been banned for use under floors since 2016 because stapled foil can cause electrocution risks and does not provide sufficient thermal resistance. Avoid using or repairing existing foil insulation under floors.
2.3.2 Installation Considerations
Before insulating, check that your underfloor space is accessible and dry. Remove any existing foil insulation carefully (turn off electricity first). Use appropriate fixings or strapping to hold bulk insulation in place; avoid compressing the material, which can reduce its performance. In exposed underfloor spaces (like houses on piles), additional protective sheeting may be needed to protect insulation from wind and rain.
Insulation installers must follow safe work practices, including using appropriate protective equipment, handling materials properly and avoiding contact with electrical wiring. DIY installation is possible for accessible underfloor spaces but professional installation ensures optimum results and compliance with Healthy Homes Standards.
2.4 Ground Moisture Barriers
Ground moisture barriers (polyethylene sheets laid over the ground under your house) prevent damp earth from adding moisture to the air and reduce mould growth. They are particularly important in homes with unsealed crawl spaces or bare ground. Easy Insulation notes that ground moisture barriers offer moisture control, enhanced comfort, energy efficiency and a healthier living environment. They are also required by the Healthy Homes Standards for rental properties when the subfloor space is accessible.
2.4.1 Choosing a Ground Moisture Barrier
Look for heavy‑duty, UV‑stabilised polyethylene with a thickness of at least 0.25 mm. It should be secured so that it covers the entire ground area, overlapped at seams and held down with weights or pegs to prevent movement. The barrier should not touch the underside of the floor, and drainage around the home must be adequate to prevent water pooling.
2.4.2 Installation Considerations
Professional installers will clear debris, ensure the ground is relatively even, and lay the membrane with overlaps. They also ensure adequate ventilation is present in the subfloor space to avoid stale air. If there are existing moisture problems or drainage issues, these must be remedied before installation. After installation, periodic checks ensure the barrier remains intact and is not damaged by rodents or other activities.
3. Insulation Materials and Techniques
Understanding the properties of different insulation materials helps you choose the best product for your home. Here we discuss common materials used in New Zealand and factors to consider when selecting them.
3.1 Glasswool (Fibreglass)
Glasswool is made from recycled glass melted and spun into fibres. It is one of the most widely used insulation materials in New Zealand, sold under brands such as Pink Batts, Earthwool and Bradford Gold. Features include:
- High thermal performance and R‑values across a range of densities.
- Good acoustic properties, reducing noise transfer between rooms and from outside.
- Non‑combustible; it will not catch fire under normal conditions.
- The fibres can irritate skin and lungs during installation, so appropriate protective equipment (gloves, goggles and mask) is required.
- Glasswool is cost‑effective and widely available. However, it can settle over time if not installed correctly. It also requires careful handling to avoid compressing the material, which reduces its R‑value.
3.2 Polyester
Polyester insulation is made from recycled plastic (often drink bottles) and is available from brands like Mammoth and GreenStuf. It is soft, non‑itchy, non‑allergenic and safe to handle without masks or gloves. Key advantages include:
- High recycled content and strong environmental credentials.
- Resilient fibres that do not slump or settle over time.
- Excellent acoustic properties and moisture resistance.
- Suitable for people sensitive to glasswool.
- Polyester insulation tends to be more expensive than glasswool but offers longevity and ease of installation. It is ideal for households prioritising low chemical content and sustainability.
3.3 Natural Wool
Natural wool insulation uses sheep’s wool and combines natural fibres with synthetic binders. It offers very good thermal and acoustic performance, is moisture absorbent (wool can absorb and release moisture without losing insulation properties) and is non‑toxic. Products include Tera Lana and some GreenStuf lines. Wool insulation can be more expensive and may attract rodents if not properly treated. Its ability to regulate humidity makes it suitable for damp or high‑moisture environments.
3.4 Polystyrene (EPS/XPS)
Expanded polystyrene (EPS) and extruded polystyrene (XPS) boards are rigid insulation materials used under concrete slabs, perimeter foundations and in some wall systems. They have very high compressive strength and moisture resistance. Key points:
- High R‑value per thickness; for example, an EPS board can achieve R2.5 with a thickness of 100 mm.
- Suitable for perimeter insulation in new builds and underfloor installations on concrete slabs.
- Resistant to moisture and mould; XPS has lower water absorption than EPS.
- Not suitable near high temperatures (e.g., flues or chimneys) and must be protected from UV exposure.
3.5 Cellulose
Cellulose insulation is made from recycled paper treated with fire retardants. It is often blown in as loose‑fill in ceilings or walls. It offers good thermal performance and can fill irregular cavities. However, it can settle over time and may require top‑ups. Moisture exposure can reduce its effectiveness. Professional installation ensures the correct density to prevent settling and maintain thermal performance.
3.6 Spray Foam
Spray polyurethane foam is an expanding foam applied in liquid form that quickly expands and hardens, filling cavities and sealing gaps. It offers very high R‑values, excellent air sealing and moisture resistance. Key considerations:
- Spray foam can be open‑cell (softer, lower R‑value) or closed‑cell (rigid, higher R‑value and moisture barrier).
- Requires professional installation due to the chemicals involved.
- More expensive than traditional batts or loose‑fill.
- Must be applied under controlled conditions to ensure proper expansion and avoid off‑gassing or structural issues.
3.7 Reflective (Foil) Insulation
Reflective insulation uses shiny foil surfaces to reduce radiant heat transfer. In New Zealand, foil is not used as a primary insulation material due to safety concerns and insufficient thermal performance. Foil underfloor insulation has been banned because when it is stapled into place, there is a risk of electrocution if the foil contacts live wiring. However, foil surfaces may be included in some products to supplement bulk insulation by reflecting radiant heat.
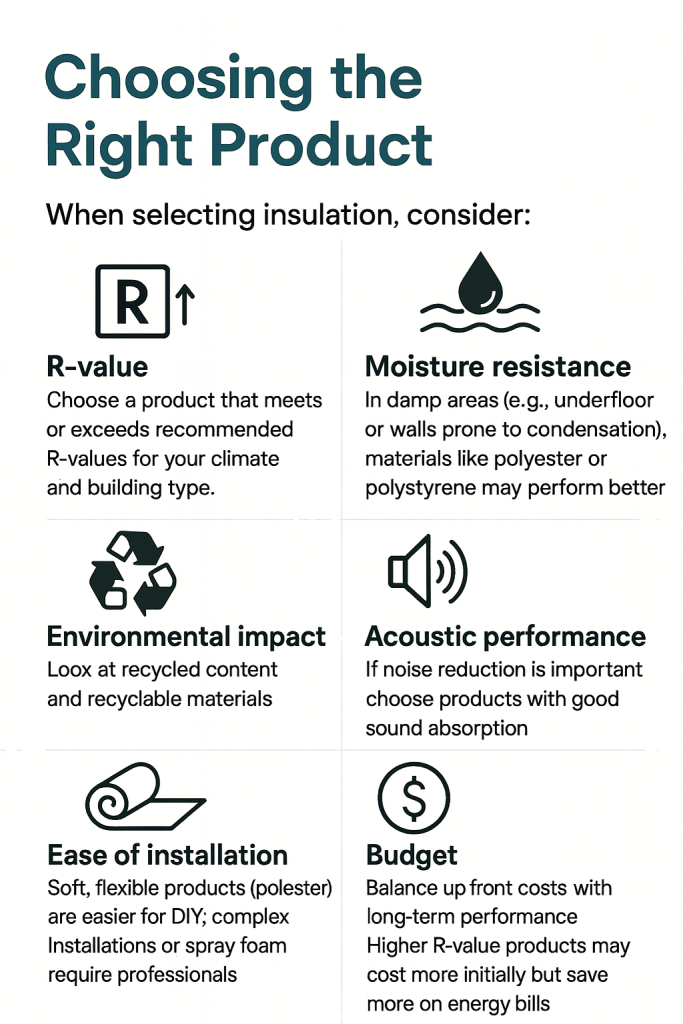
3.8 Choosing the Right Product
When selecting insulation, consider:
- R‑value: Choose a product that meets or exceeds recommended R‑values for your climate and building type.
- Moisture resistance: In damp areas (e.g., underfloor or walls prone to condensation), materials like polyester or polystyrene may perform better.
- Environmental impact: Look at recycled content and recyclable materials.
- Acoustic performance: If noise reduction is important, choose products with good sound absorption.
- Ease of installation: Soft, flexible products (polyester) are easier for DIY; complex installations or spray foam require professionals.
- Budget: Balance up‑front costs with long‑term performance. Higher R‑value products may cost more initially but save more on energy bills.
Consult with a professional to match products to your home’s specific needs. Easy Insulation works with a variety of brands including Pink Batts, Earthwool, Mammoth, Bradford, GreenStuf, Tera Lana and more. Their consultants will recommend options that suit your home and budget.
4. Government Grants and Programmes
Insulating a home can be a significant investment. Fortunately, New Zealand offers government programmes that subsidise insulation for eligible homeowners and tenants. This chapter explains the main schemes available in the Taupo, Rotorua and Tokoroa regions and how you can benefit from them.
4.1 Warmer Kiwi Homes Grant (EECA)
The Energy Efficiency & Conservation Authority’s (EECA) Warmer Kiwi Homes programme provides funding to make homes warmer and healthier. It offers insulation and heating subsidies for low‑income homeowners. Easy Insulation is a long‑standing EECA contractor and an approved provider for the programme. Key points:
- Funding Levels: Homeowners can receive 90 % funding if they live in a decile 9 or 10 low‑income area or hold a Community Services Card. Those in decile 8 areas receive 80 % funding, and in deciles 5–7 funding is 50 %. Additional funding from local trusts (e.g., Maru Energy Trust) may cover the remaining cost, providing some households with 100 % free insulation.
- Eligibility: Your home must have been built before 2008, you must own and live in the home and either hold a Community Services Card or live in a low‑income area. Your home must have little or no existing insulation (ceiling and underfloor) and be located within EECA’s priority zones (5–10).
- Application Process: Contact Easy Insulation to arrange a free assessment. A consultant will check your existing insulation, determine eligibility, and prepare an application. EECA funding is limited, so apply early. Once approved, Easy Insulation schedules installation, completes the work and submits paperwork on your behalf.
- Heating Grant: EECA also offers a heating grant for approved clean heat appliances (e.g., heat pumps, wood burners). The heating grant is separate from insulation and typically covers up to 80 % of the cost. You must have adequate insulation installed before being eligible for heating assistance.
4.2 Maru Energy Trust – Be Warm Be Healthy Programme
The Maru Energy Trust is a community initiative that partners with EECA to tackle energy poverty in The Lines Company area (which includes parts of the Central Plateau). The trust provides free insulation and heating to eligible homeowners who cannot afford to pay for the remaining portion not covered by EECA. Important details:
- Eligibility: You must live in a home built before 2008, hold a Community Services Card or SuperGold Combo card, live in a low‑income area or be referred by the local Healthy Homes Initiative. Households already insulated under EECA may qualify for a heating grant.
- Process: Easy Insulation works with Maru to assess your eligibility and apply for funding. Once approved, insulation and heating are installed free of charge. The trust aims to ensure that vulnerable households are not left behind due to financial constraints.
- Mission: The trust’s mission is to create warmer, drier homes and reduce energy use and carbon emissions. As a not‑for‑profit, its programmes prioritise community well‑being over profit.
4.3 Healthy Homes Standards and Building Code Changes
In 2019 the New Zealand Government introduced the Healthy Homes Standards, requiring landlords to meet minimum standards for heating, insulation, ventilation, moisture ingress/drainage and draught stopping in rental properties. Key points include:
- Insulation: Ceiling insulation must be at least 120 mm thick (or meet 2008 building code requirements); underfloor insulation must be present unless it is not reasonably practicable. Landlords must meet these standards by 1 July 2025.
- Heating: The main living room must be able to be heated to at least 18 °C using a fixed heater that meets efficiency criteria.
- Ventilation: Kitchens and bathrooms must have extractor fans; all habitable rooms require openable windows.
- Moisture and drainage: Properties must have efficient drainage and downpipes; ground moisture barriers are required in subfloor spaces.
- Draught stopping: Gaps and holes that cause noticeable draughts must be blocked.
These standards ensure rental properties are warm and dry. For owner‑occupied homes, although not legally required, meeting these standards improves comfort and property value.
In 2023, the Building Code was updated to increase insulation requirements for new homes. The new H1/AS1 acceptable solution requires roof insulation of R6.6, wall insulation of R2.0 and floor insulation between R1.5 and R3.0 depending on floor type. These changes reflect the need for higher performance as energy costs rise and climates become more extreme. Retrofitting to higher R‑values in existing homes is optional but advisable to future‑proof your property.
4.4 Community and Local Grants
In addition to national programmes, some councils and energy retailers offer low‑interest loans or grants for insulation and heat pumps. Contact your local council or electricity retailer to see if they have schemes that allow you to add insulation costs to your rates or power bill and pay it off gradually. In the Central Plateau, community funds occasionally supplement EECA and Maru grants; Easy Insulation can advise on any current local initiatives.
5. Insulating for New Builds and Commercial Properties
While much of this guide focuses on retrofitting existing homes, insulation is equally important in new construction and commercial buildings. The way a building is designed and constructed influences its thermal performance for decades.
5.1 New Homes
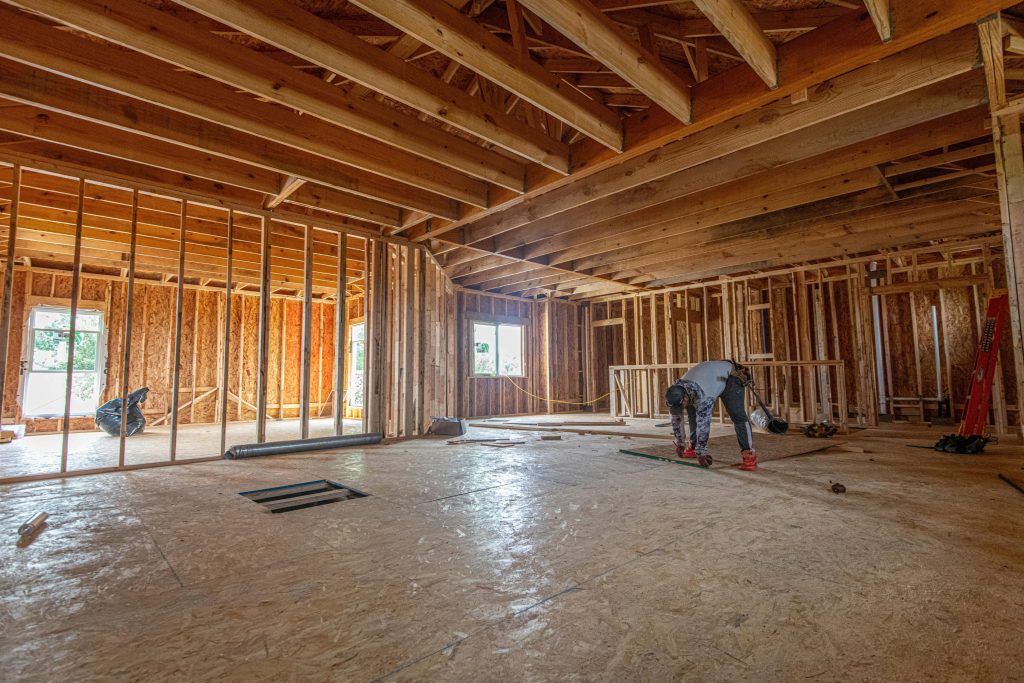
New homes must comply with current Building Code requirements. Designers and builders should incorporate high R‑values from the outset, reducing long‑term energy use and improving comfort. The recent building code update requires more than double the previous roof insulation levels and higher wall and floor insulation. Incorporating continuous insulation layers, thermal breaks (to reduce heat transfer through framing) and airtight construction helps achieve higher performance. For example, using rigid insulation on exterior walls or around the perimeter of concrete slabs reduces thermal bridging (heat loss through timber or steel framing)
Homeowners should also consider orientation, window placement and shading. Proper solar design reduces heating needs in winter and cooling needs in summer. Combining high insulation, airtight construction and heat recovery ventilation leads to near‑passive house performance. Although initial costs are higher, long‑term energy savings and comfort justify the investment.
5.2 Commercial Buildings
Commercial insulation is vital for businesses wanting to reduce energy costs, create comfortable workplaces and meet regulatory requirements. Easy Insulation works with commercial clients in Taupo and surrounding areas to improve insulation in offices, retail spaces and industrial buildings. Benefits of commercial insulation include:
- Reduced energy bills and operational costs through better thermal performance.
- Enhanced comfort and productivity for employees and customers.
- Improved environmental sustainability and reduced carbon emissions.
- Compliance with building codes and Healthy Homes Standards where applicable.
Commercial buildings often have different challenges, such as larger roofs, complex HVAC systems and higher internal heat loads. Insulation may need to meet specific fire ratings, acoustic requirements or weight restrictions. Easy Insulation assesses each building’s needs and designs appropriate insulation solutions using high‑quality materials and experienced installers.
6. Choosing an Insulation Provider
Once you understand the importance of insulation and the options available, choosing the right provider becomes the next step. Here are factors to consider when selecting an insulation company and reasons to choose Easy Insulation.
6.1 Qualifications and Experience
An experienced installer ensures your insulation performs as intended. Easy Insulation has been insulating homes since 2008 and has made nearly 10 000 homes warmer. They are one of the only government‑approved insulation contractors in Taupo, and their team is trained, accredited and fully insured. Working with an experienced provider reduces the risk of poor installation and ensures compliance with codes and grant requirements.
6.2 Quality of Materials
Look for companies that use reputable brands. Easy Insulation has wholesale accounts with New Zealand’s best brands, including Pink Batts, Mammoth, Earthwool, Eco, Tera Lana, GreenStuf and Bradford. They will recommend materials that suit your needs, whether you prioritise high recycled content, low chemical emissions or the highest R‑value. Avoid providers who use generic or imported products without certification.
6.3 Customer Focus and Ethics
Some insulation companies pressure customers into expensive upgrades or unnecessary extras. Easy Insulation prides itself on being quality‑ and audit‑driven; they do not use high‑pressure sales techniques and provide objective recommendations based on your needs. Reviews and testimonials highlight their commitment to positive customer experiences and professional service. They provide free assessments and quotes without obligation.
6.4 Accreditation and Grant Partnerships
Check whether the provider is an approved contractor for EECA and local grant programmes. Only approved installers can access Warmer Kiwi Homes funding. Easy Insulation has a longstanding partnership with EECA and the Maru Energy Trust. Choosing them ensures your eligibility for subsidies and that installation meets the standards required for funding.
6.5 Service Area
For homeowners in Taupo, Rotorua and Tokoroa (South Waikato), Easy Insulation is a local company. They understand the climate, building stock and community needs of the Central Plateau. Their proximity means quick response times and better after‑sales service. They focus exclusively on this region; they do not service other areas, ensuring dedicated local expertise.
6.6 Insurance and Guarantees
Ask about warranties on materials and workmanship. Quality products generally come with warranties of 10–50 years. Professional installers may also provide guarantees on installation, ensuring the insulation remains effective and does not slump or deteriorate. Easy Insulation stands behind their work and will address any issues promptly.
7. Planning and Implementing Your Insulation Project
Insulating your home is a process that involves assessment, planning, installation and follow‑up. Working with professionals simplifies this process, but it is useful to understand the steps involved.
7.1 Assessment
The first step is to assess your current situation. Easy Insulation offers a free, no‑obligation assessment. An assessor will:
- Inspect your ceiling, walls, underfloor and subfloor spaces to check existing insulation levels and condition.
- Identify drafts, moisture problems and potential issues like downlights or tight access.
- Measure your home and determine the amount of insulation needed.
- Discuss your budget, goals and any eligibility for grants.
During this assessment, feel free to ask questions about materials, R‑values and installation methods. Good communication ensures your concerns are addressed and that you choose the right solution.
7.2 Quoting and Funding Application
After the assessment, you will receive a detailed quote outlining:
- The recommended insulation type, R‑value and thickness.
- The cost of materials and installation.
- Potential grant funding (e.g., Warmer Kiwi Homes or Maru Energy Trust) and your co‑payment.
- A timeline for installation.
If you qualify for grants, Easy Insulation will manage the application process on your behalf. They will gather necessary documents (proof of home ownership, community services card, etc.), submit the application to EECA or other grant providers and keep you informed of progress. Funding approval may take a few weeks depending on availability and eligibility.
7.3 Preparation
Before installation day, prepare your home by:
- Clearing access to your ceiling hatch, walls or underfloor area.
- Removing stored items that could hinder installers.
- Arranging for pets or children to be out of work areas.
- If your ceiling cavity or underfloor space contains hazards (e.g., old foil insulation, asbestos, vermin), the installation team will advise on removal or remediation before proceeding.
7.4 Installation
On installation day, the team will arrive with materials and equipment. The process generally includes:
- Safety check: Ensuring power is turned off when working near wiring, using protective equipment and verifying that structural elements are sound.
- Removal of old insulation (if necessary): Removing damp, mouldy, compressed or banned materials like foil. Some older insulation can be left in place as a base layer, with new insulation added on top.
- Installing new insulation: Cutting batts or rolls to fit snugly without gaps, injecting or blowing loose‑fill evenly, or placing rigid boards and moisture barriers. Installers will ensure that insulation does not block ventilation openings or contact heat sources.
- Quality check: Inspecting the installation to ensure full coverage and correct thickness. Taking photos or conducting thermal imaging for verification.
Professional installers also tidy up and remove waste materials. The installation may take a few hours for a small home or several days for larger, complex jobs.
7.5 Post‑Installation and Documentation
After installation, you should receive documentation including:
- A certificate of insulation showing the R‑value, material type and date of installation. Landlords need this certificate to prove compliance with the Healthy Homes Standards.
- Warranty information for the insulation products.
- Maintenance guidelines (e.g., avoid compressing ceiling insulation when using attic space, check ground moisture barrier periodically).
- For grant recipients, confirmation that the work was completed and funded correctly.
7.6 Monitoring and Future Upgrades
Once insulated, monitor your home’s performance. You should notice warmer temperatures, reduced heating costs and less condensation. If you experience persistent cold spots or moisture issues, contact your installer to investigate. Over time, insulation requirements may change as regulations evolve; consider upgrading to higher R‑values or adding wall insulation in future renovations.

The Takeaway
Insulation is one of the most effective ways to improve comfort, health and energy efficiency in your home. By understanding how heat loss occurs, the importance of R‑values, and the benefits of insulating ceilings, walls, floors and ground spaces, you can make informed decisions about your insulation project. The availability of government grants such as Warmer Kiwi Homes and the Maru Energy Trust means that insulation is affordable for many homeowners in the Central Plateau. Meeting the Healthy Homes Standards not only ensures compliance for landlords but creates healthier living environments for everyone.
Showcase: Easy Insulation – Reliable Comfort for Central Plateau Homes
Whether you’re nestled in Taupō, Rotorua Lakes, South Waikato, Taumarunui, or the Ruapehu district, Easy Insulation is your trusted local insulation partner for creating warmer, drier, and healthier homes throughout the Central Plateau of the North Island. Here’s why Central Plateau homeowners consistently recommend them:
1. Deep Regional Expertise
Operating since 2008 from Taupō, Easy Insulation has tailored its services to meet the unique insulation requirements of Central Plateau homes—across diverse climates and building types. Their in‑house team is highly experienced and accredited, holding IAONZ membership and contracted by EECA, ensuring compliance with NZ standards like NZS 4246:2016.
2. Comprehensive Insulation Solutions
They cover a full spectrum of insulation services—retrofit or new‑build, residential or commercial—including:
- Ceiling and underfloor insulation
- Wall insulation
- Ground vapour/moisture barriers
Each solution is customised to your specific circumstances and built to last, helping ensure year‑round comfort.
3. Access to Top-Tier Insulation Brands
Easy Insulation installs trusted New Zealand brands known for performance and environmental credentials—such as Pink Batts, Earthwool, Mammoth, Bradford, Eco Insulation, Tera Lana, and GreenStuff—so your home’s thermal efficiency and sustainability are not compromised.
4. Funding and Subsidy Expertise
They specialise in navigating government and regional grants:
- EECA Warmer Kiwi Homes Programme: Offers 50%–100% subsidies, with higher levels for those in high-deprivation zones or holding a Community Services Card. Read more: https://www.easyinsulation.co.nz/eeca-warmer-kiwi-homes-insulation-grant/
- Maru Energy Trust’s Be Warm Be Healthy Programme: Delivers free insulation to eligible households, especially in rural Ruapehu areas. Read more: https://www.easyinsulation.co.nz/maru-energy-trust-be-warm-be-healthy-programme/
- Recently, as of 5 August 2025, the Warmer Kiwi Homes subsidy eligibility expanded by an additional 300,000 homes nationwide—making now a prime time to enquire. http://www.easyinsulation.co.nz/
- Previously secured funding through to 30 June 2025 aided thousands of Central Plateau households.
5. Client-Centric Culture and Quality
Easy Insulation puts customer experience at the forefront:
- They don’t use high-pressure sales tactics.
- They’re quick to own and remedy any installation concerns.
6. Simplified Process and Great Support
From initial eligibility checks to free, no-obligation home assessments, they guide you through every step:
- Check funding eligibility for your home.
- Receive a tailored installation plan.
- Enjoy quieter, healthier, and more energy-efficient living—all delivered with minimal fuss.
So, if you’re committed to achieving a healthier, more energy-efficient home in the Central Plateau, Easy Insulation is a standout choice. Their local knowledge, full-service offerings, access to trusted brands, and ability to help you tap into generous subsidies make them an ideal partner to bring your home up to standard.
Sources
- Easy Insulation (servicing Taupo, Rotorua and Tokoroa) https://www.easyinsulation.co.nz/
- EECA: https://www.eeca.govt.nz/
- MARU: https://maruenergytrust.org.nz/